A Beginner's Guide to DTF Paper and Film Settings
Direct-to-film (DTF) printing shows significant market growth. Users achieve optimal results on DTF film with high ink density, a solid white underbase, and 1440x720 DPI resolution. The question of what paper setting for dtf film is best is common. For DTF paper, operators should lower ink saturation. This prevents bleeding. Heat press settings are also critical; film requires approximately 315°F.
| Metric | Value |
|---|---|
| Growth Rate | CAGR of 6.0% |
| Period | 2025 to 2030 |
Understanding what paper setting for dtf film to select in the RIP software is a key step.
DTF Paper vs. Film: Which Should You Choose?
Choosing the right transfer medium is fundamental to achieving professional results in DTF printing. Both film and paper offer unique advantages. The final choice depends on the project's specific requirements, including fabric type, design complexity, and desired durability.
Understanding DTF Film
DTF film is the industry standard for high-quality, durable apparel decoration. Its non-absorbent surface allows for a high ink load, creating vibrant designs with a solid white underbase. This material excels in performance and durability.
- Wash Resistance: Prints maintain bold and bright colors through many wash cycles.
- Stretch Resilience: Designs move with the fabric, preventing cracks and peels, which is essential for performance wear containing spandex.
- Adhesion Strength: The transfer affixes completely to the garment for long-lasting wear.
Advanced thermoplastic polyurethane (TPU) powders give the final transfer a flexible, rubber-like bond that stretches and rebounds with athletic fabrics.
Understanding DTF Paper
DTF paper presents a more cost-effective alternative, though it has distinct characteristics. Its porous nature requires lower ink saturation to prevent bleeding. While versatile, its performance has certain trade-offs compared to film.
| Aspect | Applications (Pros) | Limitations (Cons) |
|---|---|---|
| Cost | More budget-friendly for certain runs. | Ink and material costs can add up. |
| Feel | Creates a soft feel on the fabric. | Can add a slight texture to the garment. |
| Durability | Good for standard apparel. | May be less durable under harsh conditions. |
A Quick Guide to Choosing Your Material
Operators should select DTF film for premium, high-stretch garments like athletic wear or for any application demanding maximum durability and color vibrancy. The question of what paper setting for dtf film to use in the RIP software is vital for this process. Conversely, DTF paper is a suitable option for promotional items, budget-conscious projects, or prints on standard cotton fabrics where extreme stretchability is not a primary concern.
Printer Settings for DTF Film
Optimizing printer settings is essential for transforming a digital design into a high-quality physical transfer. For DTF film, these settings control ink application, color accuracy, and overall print clarity. Operators must configure their RIP (Raster Image Processing) software correctly to leverage the film's non-porous surface and achieve professional-grade results.
Ink Density and White Underbase
Ink density directly impacts the vibrancy and feel of the final print. DTF film requires a robust white underbase to make colors pop, especially on dark or colored garments. The RIP software enables operators to lay down a 100% white ink layer beneath the color layer. This solid foundation prevents the garment's color from showing through and ensures the design's true colors are accurately represented.
For color inks, a balanced density is key.
Pro Tip: A general ink density of 85–90% provides excellent opacity and smooth color blending. This setting prevents ink from pooling or smudging while ensuring rich, saturated colors.
When printing on dark fabrics, operators should adjust the film saturation. A recommended ink density of 12-15% film saturation is ideal for these applications. This precise control prevents over-saturation and ensures a clean, sharp transfer.
Resolution and Print Speed
Print resolution, measured in dots per inch (DPI), determines the level of detail in a design. A higher resolution produces sharper images, smoother gradients, and crisper text.
For detailed and vibrant DTF prints, a resolution of at least 1440x720 DPI is recommended. This setting ensures that fine lines and intricate patterns are rendered clearly. For designs that demand maximum sharpness, such as photorealistic images or complex gradients, a higher resolution of 1440x1440 DPI is even better. This allows the printer to deposit more ink dots per inch, significantly enhancing sharpness and color depth. Operators should note that higher resolutions typically increase print time, so they must balance the need for detail with production speed requirements.
What Paper Setting for DTF Film
A frequent question from beginners is what paper setting for dtf film to use within the RIP software. Since DTF film is not a standard paper, there is no universal "film" setting in most printer drivers. Instead, operators must configure specific parameters within their RIP software, such as AcroRIP or CADlink. Proper configuration is the true answer to what paper setting for dtf film is best.
Here are the crucial settings to adjust:
- White Ink Coverage: Enable 100% white ink coverage under color pixels. This creates the solid white base necessary for vibrant colors.
- Print Order: Select the correct print sequence. The standard method is "Print Color First," followed by a "Color + White" pass. This layering technique improves ink adhesion and overall brightness.
- ICC Color Profile: Choose the specific ICC profile designed for your printer, ink set, and film combination. This profile acts as a translator, ensuring the colors on your screen match the printed output and preventing issues like over-saturation or dull tones.
By mastering these software settings, operators can achieve consistent, high-quality results with every print.
Printer Settings for DTF Paper
Configuring printer settings for DTF paper requires a different approach than for film. The paper's porous, absorbent surface is the primary factor influencing these adjustments. Operators must carefully manage ink output and select the correct media profiles to prevent oversaturation and ensure a clean, high-quality transfer. Proper settings are crucial for achieving sharp details and a soft hand feel on the final garment.
Adjusting Ink Saturation
The most critical adjustment for DTF paper is lowering the ink saturation. Unlike non-porous film, DTF paper absorbs ink. Applying too much ink causes it to spread through the paper's fibers, a phenomenon known as "ink bleeding." This bleeding results in fuzzy edges, blurred details, and muddy colors.
Operators should use their RIP software to reduce the overall ink density. A good starting point is to decrease the total ink limit by 20–30% compared to a standard film setting. This reduction ensures that the ink dots remain crisp and well-defined on the paper's surface, leading to a sharper final print.
Expert Tip: 💡 Always perform a small test print after adjusting saturation. Print a small, detailed design to check for any signs of bleeding before committing to a full production run. This simple step saves time, ink, and materials.
Print Quality Modes
RIP software and printer drivers offer various print quality modes that balance speed with detail. The choice of mode directly impacts the final appearance of the transfer. Operators must select a mode that aligns with the specific requirements of each design. There is often a trade-off between production speed and image resolution.
- High-Speed Mode: This setting is best for simple designs, such as text-based graphics or bold logos. It prints faster but may sacrifice fine detail, making it suitable for bulk orders where speed is a priority.
- Fine-Detail Mode: This mode is ideal for photographic images, intricate patterns, or designs with small text. It slows down the print speed to lay down ink more precisely, resulting in superior sharpness and smoother gradients.
- Optimization: Users should ensure their artwork is optimized before printing. Using files with a resolution of 300 DPI in a CMYK color space helps the printer process the data efficiently and reduces the chance of errors.
- RIP Software Presets: Modern RIP software like AcroRIP or CADlink allows operators to create and save custom presets. Creating presets for different job types (e.g., "Bulk Logos" vs. "Photo Prints") enables quick and consistent switching between modes.
Selecting Media Type in Driver
Printer drivers and RIP software do not have a dedicated "DTF Paper" setting. Therefore, operators must select an existing media type that mimics the desired printing conditions. The selected media type tells the printer how much ink to use and what print head height to maintain. Choosing the wrong setting can lead to poor ink control or even print head strikes.
For DTF paper, selecting a profile for uncoated or matte paper is generally effective. These settings are designed for absorbent surfaces and automatically limit the ink output.
| Media Type Setting | Why It Works | Best For |
|---|---|---|
| Plain Paper | Uses the lowest ink volume to prevent oversaturation on highly absorbent media. | Simple text or line art where color vibrancy is less critical. |
| Matte Coated Paper | Provides a good balance of ink control and color depth. | General-purpose use, including graphics with solid colors. |
| Premium Matte | Offers slightly higher ink output than standard matte for richer colors while still controlling bleed. | Designs requiring better color saturation without sacrificing sharpness. |
Operators should test these settings with their specific paper, ink, and printer combination to find the optimal choice for their workflow. This calibration ensures consistent and reliable results for every project.
Nailing the Heat Press Settings

The heat press is where a DTF transfer comes to life. Operators must master temperature, time, and pressure settings to create a durable, professional-quality garment. These settings vary significantly between DTF film and paper, directly impacting the final look and feel of the design.
Heat Press Settings for DTF Film
DTF film requires precise heat and pressure to properly bond the TPU adhesive to the fabric fibers. The ideal settings depend on the garment's material composition. Operators should always start with the manufacturer's recommendations and adjust based on test results.
| Fabric Type | Temperature (°F) | Time (seconds) | Pressure |
|---|---|---|---|
| Cotton | 310–320 | 15–20 | Medium to Firm |
| Polyester | 280–290 | 10–15 | Medium |
| Blends | 300–310 | 12–15 | Medium to Firm |
Pressure is equally important for strong adhesion. A medium pressure of 25-35 PSI is effective for most standard fabrics. Thicker materials like denim or canvas benefit from firm pressure (40-60 PSI) to ensure the design embeds correctly.
Heat Press Settings for DTF Paper
DTF paper transfers often require slightly different settings to prevent scorching the paper or the garment. Operators should always pre-press the fabric for a few seconds to remove moisture and create a smooth surface. Using a protective Teflon sheet is also a best practice.
The following chart provides a general guide for different materials:
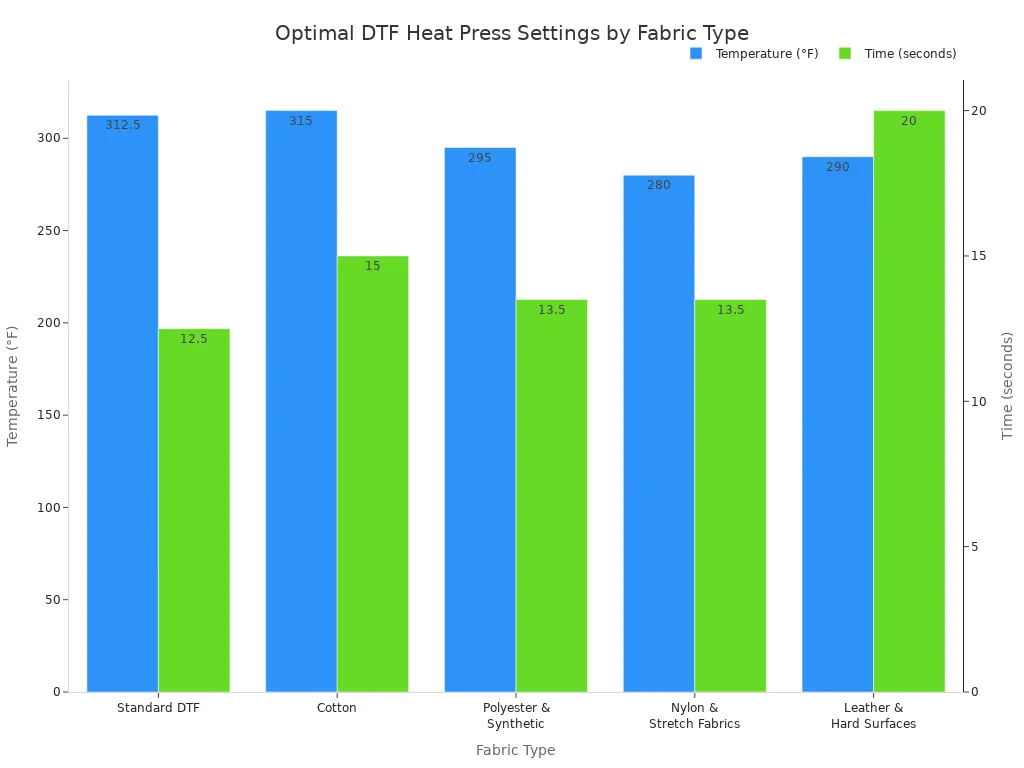
Pro Tip: 💡 Over-pressing can cause fading or cracking. Operators should always test their settings on a sample piece of fabric before starting a full production run to ensure optimal results.
Hot Peel vs. Cold Peel Technique
The peeling method determines the final texture and finish of the transfer.
- Hot Peel: The operator removes the carrier sheet immediately after the heat press opens. This technique is faster and typically results in a softer, more matte finish as the ink integrates more with the fabric.
- Cold Peel: The operator waits for the garment and transfer to cool down completely before removing the carrier sheet. This method is standard for DTF film because it ensures maximum adhesive transfer, leading to superior durability and a slightly glossier finish.
Choosing the right peel technique is essential for achieving the desired outcome and ensuring the longevity of the print.
Troubleshooting Common Issues
Even with precise settings, operators can encounter issues during the DTF process. Understanding the root causes of common problems is the first step toward achieving consistent, high-quality results. This section addresses frequent challenges and provides actionable solutions.
Fixing Powder Adhesion Issues
Uneven powder adhesion is a common frustration that often stems from environmental factors. Operators must manage their workspace to prevent these problems.
- High Humidity: Excess moisture in the air causes powder to clump and stick to non-image areas of the film.
- Low Humidity: Dry conditions can create static electricity, causing powder to cling randomly to the film surface.
- Powder Quality: Damp or contaminated powder will not apply evenly.
Solution: 💡 Operators should always use clean, dry tools and wear gloves to handle powder. Utilizing calibrated scoops ensures accurate application, while a 'first-in, first-out' inventory system maintains powder quality. Storing materials in a climate-controlled environment is crucial.
Solving Dull or Faded Colors
Vibrant colors are a hallmark of DTF, but faded results can occur for several reasons. The issue often lies in the print settings or materials. Incorrect curing temperature or time can prevent the adhesive from melting properly. Using non-DTF inks or failing to apply a white underbase will also lead to weak colors.
To fix this, operators should calibrate their equipment and software.
- Use Correct Color Profiles: Stick to established profiles like Adobe RGB for design work to prevent color shifts.
- Optimize RIP Software: Regularly update your RIP software and adjust the white ink settings to enhance color brightness.
- Check Image Quality: Ensure all design files have a resolution of at least 300 DPI and are converted to a CMYK color profile.
Correcting Incomplete Transfers
An incomplete transfer happens when parts of the design fail to adhere to the garment. This problem almost always points to the heat press process. Insufficient pressure, incorrect temperature, or cold spots on the heat platen are primary culprits.
Operators can troubleshoot this issue by verifying their heat press settings. They should recheck the recommended temperature and pressure for the specific fabric type. Using premium transfer films also improves adhesion and durability. A quick test print on a scrap piece of fabric can confirm that settings are correct before starting a full production run.
Operators achieve success by matching settings to their material, using high ink density for film and lower saturation for paper. They must always verify heat press temperature, time, and pressure. A small test print, using a 300 DPI CMYK file, confirms that all settings are perfectly dialed in.
FAQ
What is the best resolution for DTF printing?
Operators should use 1440x720 DPI for most designs. For highly detailed images, a 1440x1440 DPI resolution provides superior sharpness and clarity on the final garment.
Why is my DTF transfer cracking after washing?
Cracking often results from incorrect heat press settings. Operators must verify the temperature, pressure, and time are correct for the specific fabric type to ensure a durable bond.
See Also
Leading Precoating Solutions for Advanced Filtration Systems in the Coming Year
Essential Frame Plate Kits: A Novice's Guide to Automotive Reinforcement
Tablet Sampling Machines Unveiled: The Definitive Laboratory Selection Handbook
Automatic UV Coaters: Indispensable for Achieving Peak High-Speed Printing Efficiency
Demystifying Sterile Filter Devices: A Comprehensive Look at Their Operation