Your Go-To Walnut Shell Removal Guide for Beginners
Many beginners find walnut shell removal challenging. Experts often recommend hand peeling, using a wire brush, rolling the nuts on a hard surface, or moistening the husks to simplify the task. These approaches offer safe and effective ways for individuals to access fresh walnuts with minimal effort.
Nutcracker Walnut Shell Removal
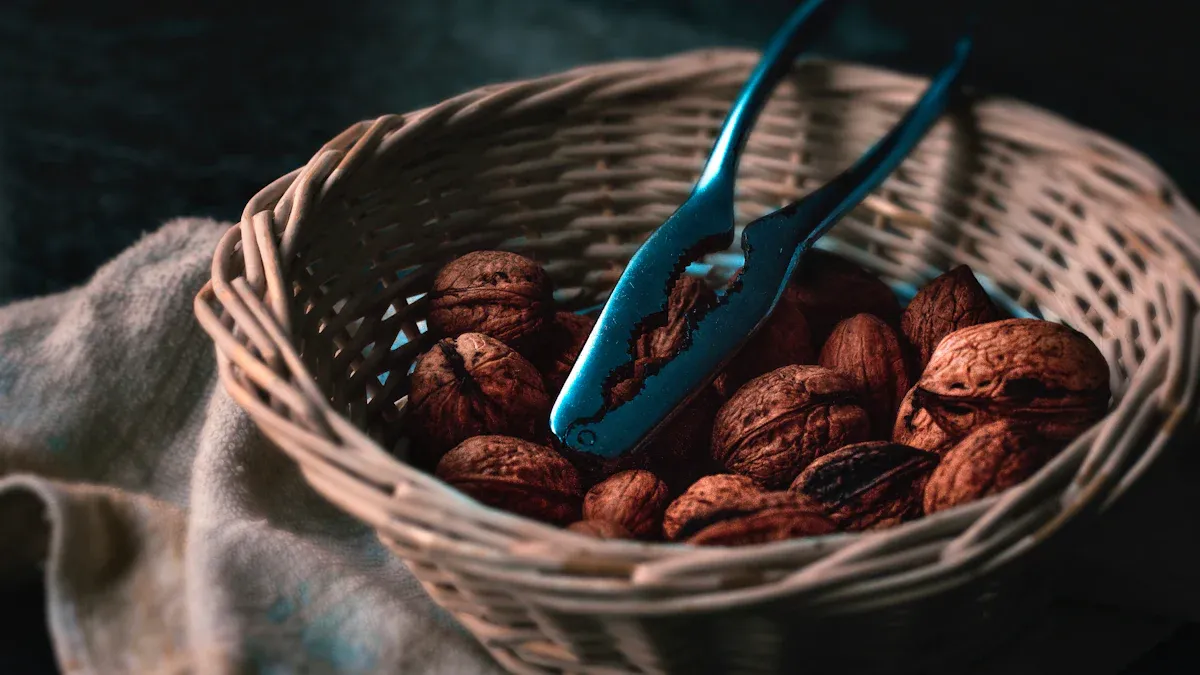
Step-by-Step Instructions
- Place the walnut securely in the nutcracker’s jaws.
- Hold the handles firmly and apply steady pressure until the shell cracks.
- Rotate the walnut and repeat the process if the shell does not open completely.
- Remove the shell fragments and extract the kernel carefully.
Tip: Cover the nutcracker with a cloth during cracking. This practice prevents shell pieces from flying, which enhances safety.
Tools Needed
- Standard handheld nutcracker
- Small bowl for collecting shells
- Clean cloth for safety
Pros and Cons
Pros:
- The nutcracker applies pressure efficiently, making walnut shell removal quick.
- This method preserves the integrity of the edible kernel.
- It works especially well for hard-shelled walnuts.
Cons:
- Some nutcrackers may not fit larger or irregularly shaped walnuts.
- Hand fatigue can occur after cracking many nuts.
- Shell fragments may scatter if not covered properly.
Tips for Best Results
- Select a sturdy nutcracker designed for hard nuts.
- Use a cloth to cover the nutcracker and minimize mess.
- Crack walnuts over a bowl to collect both shells and kernels.
- Inspect the nut after cracking to ensure all shell pieces are removed.
Nutcracker walnut shell removal offers a reliable and efficient approach for beginners. This method balances speed, safety, and kernel preservation, making it a preferred choice for many home cooks.
Hammer and Towel Walnut Shell Removal
Step-by-Step Instructions
- Place a clean kitchen towel on a sturdy surface, such as a countertop or cutting board.
- Arrange several walnuts in a single layer on the towel.
- Fold the towel over the walnuts to cover them completely.
- Use a hammer to tap each walnut gently. Apply enough force to crack the shell but avoid crushing the kernel.
- Unfold the towel and remove the cracked shells. Extract the walnut kernels carefully.
Tip: Always check the towel for sharp shell fragments before handling the nuts.
Tools Needed
- Standard hammer
- Clean kitchen towel
- Flat, sturdy surface
- Bowl for collecting shells and kernels
Pros and Cons
Pros:
- This method requires only basic household tools.
- The towel contains shell fragments, reducing mess and risk of injury.
- It works well for cracking multiple walnuts at once.
Cons:
- Excessive force can damage the walnut kernels.
- The process may require practice to achieve consistent results.
- Noise from hammering may disturb others nearby.
Tips for Best Results
- Select a thick towel to cushion the impact and protect the kernels.
- Tap the hammer lightly at first, increasing force only if necessary.
- Work in small batches to maintain control and prevent accidents.
- Inspect each walnut after cracking to ensure complete shell removal.
Hammer and towel walnut shell removal offers a practical solution for beginners. This technique simplifies walnut shell removal using common household items and provides a safe, effective approach for accessing fresh kernels.
Freezing and Cracking Walnut Shell Removal
Step-by-Step Instructions
- Place whole walnuts in a sealable plastic bag.
- Store the bag in the freezer for at least 12 hours. The cold temperature makes the shells more brittle.
- Remove the walnuts from the freezer and let them sit at room temperature for 5 minutes.
- Use a nutcracker or a small hammer to crack the shells. The shells should break more easily after freezing.
- Extract the walnut kernels and discard the shell fragments.
Tip: Allowing the walnuts to rest briefly after freezing helps prevent the kernels from becoming too hard and difficult to remove.
Tools Needed
- Sealable plastic bag
- Freezer
- Nutcracker or small hammer
- Bowl for collecting shells and kernels
Pros and Cons
Pros:
- Freezing weakens the shell, making walnut shell removal less labor-intensive.
- This method reduces the risk of crushing the kernels.
- It works well for both small and large batches.
Cons:
- The process requires advance planning due to freezing time.
- Some freezers may not reach a low enough temperature for optimal results.
- Handling very cold walnuts can be uncomfortable without gloves.
Tips for Best Results
- Use fresh, whole walnuts for the best outcome.
- Avoid over-freezing, as extremely cold shells may shatter into small, hard-to-clean pieces.
- Wear gloves when handling frozen walnuts to protect your hands.
- Test one walnut first to determine the ideal freezing time for your equipment.
Freezing and cracking offers a practical approach for beginners seeking an alternative walnut shell removal technique. This method combines preparation and simple tools to deliver consistent results.
Boiling and Cracking Walnut Shell Removal
Step-by-Step Instructions
- Fill a large pot with water and bring it to a boil.
- Add whole walnuts to the boiling water. Let them simmer for 10–15 minutes.
- Remove the walnuts using a slotted spoon and place them on a clean towel.
- Allow the walnuts to cool until they are safe to handle.
- Use a nutcracker or a small hammer to crack the softened shells.
- Extract the kernels and discard the shell fragments.
Note: Boiling softens the shells, which makes cracking easier and reduces the risk of damaging the kernels.
Tools Needed
- Large pot
- Slotted spoon
- Clean towel
- Nutcracker or small hammer
- Bowl for collecting shells and kernels
Pros and Cons
| Pros | Cons |
|---|---|
| Softens shells | Requires extra preparation |
| Reduces kernel damage | Wet shells may be slippery |
| Suitable for large batches | Longer cooling time |
Tips for Best Results
- Choose fresh walnuts for optimal results.
- Avoid overboiling, as extended exposure to water can affect flavor.
- Dry the walnuts thoroughly before cracking to prevent slipping.
- Work in small batches to maintain control and consistency.
Boiling and cracking offers a gentle approach to walnut shell removal. This method suits individuals who want to minimize kernel breakage and prefer working with softened shells.
Pliers or Adjustable Wrench Walnut Shell Removal
Step-by-Step Instructions
- Select a pair of pliers or an adjustable wrench with a comfortable grip.
- Hold the walnut firmly between the jaws, positioning it along the seam of the shell.
- Squeeze the handles gently until the shell cracks. Avoid applying excessive force to prevent crushing the kernel.
- Rotate the walnut and repeat the process if the shell does not open fully.
- Remove the shell fragments and extract the kernel with care.
Tip: Use a towel or cloth to stabilize the walnut and protect your hands during the process.
Tools Needed
- Pliers or adjustable wrench (preferably with smooth jaws)
- Clean towel or cloth
- Bowl for collecting shells and kernels
Pros and Cons
| Pros | Cons |
|---|---|
| Readily available tools | Serrated jaws may damage delicate surfaces |
| Good control over pressure | Risk of crushing the walnut kernel |
| Suitable for hard shells | May damage corners of nuts or bolt heads |
Many users appreciate the control offered by pliers or an adjustable wrench during walnut shell removal. However, serrated jaws can present challenges. These serrations may damage the walnut shell or even the kernel, especially if the tool slips. For best results, select tools with smooth jaws or use a protective cloth.
Tips for Best Results
- Choose pliers or a wrench with smooth jaws to minimize shell and kernel damage.
- Apply steady, gentle pressure rather than sudden force.
- Work over a bowl to catch shell fragments and kernels.
- Inspect each walnut after cracking to ensure no shell pieces remain.
This method offers a practical approach for those who prefer using common household tools for walnut shell removal. With careful technique, beginners can achieve clean results and minimize waste.
Walnut Shell Removal Comparison Table
Side-by-Side Overview
Selecting the right walnut shell removal technique depends on several factors, including efficiency, labor, and cost. The following table presents a clear comparison of common methods based on throughput capacity and labor requirements. These metrics help users understand which approach best fits their needs, whether they process small batches at home or larger quantities in a commercial setting.
| Method | Throughput Capacity (kg/hr/person) | Labor Requirement (man-hour/quintal) |
|---|---|---|
| Manual Cracking | 3.42 | 29.24 |
| Hand Operated Cracker | 1.61 | 62.11 |
| Power Operated Cracker | 15.46 | 6.46 |

Tool cost also plays a significant role in decision-making. Entry-level manual devices typically cost around $130, while industrial machines can exceed $20,000. The following table summarizes the price range for each tool type:
| Tool Type | Price Range |
|---|---|
| Entry-level manual device | $130 |
| Industrial machines | $20,000+ |
Professionals recommend that beginners start with manual or hand-operated tools. These options offer a balance between affordability and ease of use.
This side-by-side overview enables users to compare walnut shell removal methods quickly. By considering throughput, labor, and cost, individuals can select the most suitable technique for their requirements.
They can choose from five walnut shell removal techniques, each with unique benefits. Beginners often find the nutcracker method easiest. When selecting a method, they should consider juglone content, extraction process, purity, third-party testing, harvest timing, and label clarity. Trying different approaches helps identify the best fit.
FAQ
What is the safest walnut shell removal method for beginners?
The nutcracker method offers the safest approach. It minimizes risk of injury and preserves the walnut kernel.
Can boiling walnuts affect their flavor?
- Boiling walnuts for too long may alter their taste.
- Short boiling times help maintain the original flavor.
Are industrial machines necessary for home walnut shell removal?
Industrial machines suit commercial use. Home cooks achieve excellent results with manual or hand-operated tools.
See Also
Tips for Using Guide Bars to Simplify Cutting Tasks
Essential Frame Plate Kit Insights for New Auto Enthusiasts
How to Select Door Hardware Finishes for Home Hinges
Understanding Nozzle Options for Gardeners and Bioprinting Needs
Strengthening Doors and Hinges to Withstand Natural Disasters