How to Print on DTF Film Like a Pro in 2025
Direct-to-Film printing is a rapidly expanding sector. The industry's projected market size highlights its growing importance for professionals.
| Year | Market Size (USD Billion) | Projected CAGR (%) |
|---|---|---|
| 2025 | 2.68 | 6.70 |
An operator first prints a design onto dtf film. They then apply and cure an adhesive powder before heat-pressing the design onto a garment. Precise execution with proper equipment is vital for a vibrant, long-lasting print.
Your Pro Checklist and Step-by-Step Guide
Achieving a professional-grade DTF print requires precision, the right tools, and a methodical approach. This guide provides a comprehensive checklist and a step-by-step walkthrough to help operators master the process from design to final peel.
Essential Equipment
Investing in quality equipment is the foundation of professional DTF printing. A complete setup includes a DTF printer, a powder shaker and curing oven, and a heat press. For operators aiming for efficiency and consistency, an all-in-one powder shaker and curing unit is a critical asset. Key features to look for include:
- Automated Powder Shaking & Application: This guarantees even adhesive distribution and reduces manual labor.
- High-Efficiency Curing Oven: Precise temperature control ensures the powder melts thoroughly for durable prints.
- Built-in Air Purifier: It minimizes odors and airborne particles, promoting a safer workspace.
- User-Friendly Interface: Intuitive controls allow for easy adjustments to temperature, speed, and powder settings.
- Even Heat Distribution: Advanced heating elements prevent uneven curing, which is crucial for a professional finish.
- Optical Sensor: This feature automates the film feeding process, ensuring continuous operation and minimizing material waste.
Necessary Materials
The quality of your materials directly impacts the final print's vibrancy and durability. Operators should select consumables known for their performance and consistency.
- DTF Inks: High-quality inks produce vibrant colors and prevent printhead clogs. Industry-leading brands include Kodak DTF Ink, known for color accuracy, and STS Inks, which offer excellent wash resistance.
- DTF Film: The film is the transfer medium. It must have a good ink-absorbing layer and anti-static properties. Films are available in hot peel and cold peel varieties, each suited for different applications.
- Adhesive Powder: This thermoplastic powder binds the ink to the fabric. The choice of powder grain depends on the design's complexity.
| Powder Type | Best For | Feel |
|---|---|---|
| Fine | Small text, fine details | Softest |
| Medium | General use | Balanced |
| Coarse | Heavy fabrics (e.g., denim) | Firmer |
Brands like Ecofreen are excellent for intricate designs, while Kingdom DTF offers superior stretch resistance for apparel.
Step 1: Prepare Your Design
A flawless print begins with a well-prepared digital file. Operators must avoid common design pitfalls to prevent printing errors.
Pro Tip: Always perform a small test print before a full production run. This simple step can catch layout, color, or adhesion issues early, saving significant time and materials.
For optimal results, design files should have a resolution of at least 300 DPI at the intended print size. This ensures sharp details and clean edges. The color mode is equally important. DTF printers use a CMYK ink set, so designs should be created in a CMYK color profile from the start. Converting from RGB to CMYK later can cause unexpected color shifts and reduce vibrancy.
Step 2: Print on the DTF Film
With the design ready, the next step is printing it onto the dtf film. This requires properly configured RIP (Raster Image Processor) software to control ink laydown, especially the white underbase.
- White Underbase Settings: For dark fabrics, the white underbase provides opacity. A setting of 100% ink coverage is standard. For white highlights on a design, a 20-30% density is sufficient.
- Choke Settings: A "choke" of 2-5 pixels pulls the white underbase in slightly from the edges of the color layer. This prevents a white halo from appearing around the final design.
Regular printer maintenance is non-negotiable for consistent quality. Operators should follow a strict schedule.
- Clean printheads, capping stations, and wiper blades daily.
- Run nozzle checks before each print session.
- Maintain a stable environment with 40-60% humidity to prevent ink from drying and clogging nozzles.
Step 3: Apply the Adhesive Powder
Once the design is printed, the wet ink must be coated with adhesive powder. Even application is critical for a successful transfer. Uneven powder coverage can lead to patchy adhesion and a print that peels after washing.
Important: High humidity can cause the powder to clump, leading to poor flow and an inconsistent finish. Maintaining a controlled environment is key.
The best technique is to hold the printed film at both ends and dip the printed side into a tray of powder. Gently rock the film back and forth to ensure full coverage. After, lift the film and lightly flick the back to shake off any excess powder. For high-volume operations, an automated powder shaker handles this process with perfect consistency.
Step 4: Cure the Powdered Film
Curing melts the adhesive powder, turning it into a smooth, even layer of adhesive. This can be done with a convection oven or by hovering a heat press over the film. The operator must not let the heat plate touch the powder.
| Curing Method | Temperature Range | Time |
|---|---|---|
| Convection Oven | 320-350°F (160-177°C) | 2-3 minutes |
| Heat Press (Hovering) | 325°F (160°C) | ~2 minutes |
An operator can visually confirm a proper cure. The powder will initially look granular and sparkly. As it cures, it will melt and take on a smooth, slightly glossy, orange-peel-like texture. Under-curing results in a weak bond, while over-curing can scorch the ink.
Step 5: Press the Design
With the transfer cured, it is time to press it onto the garment.
First, pre-press the garment for 5-7 seconds. This removes moisture and wrinkles, creating a flat, dry surface for optimal adhesion.
Next, place the cured dtf film on the garment and press it using the correct settings for the fabric type. Using a Teflon sheet or parchment paper over the transfer can help protect the garment and ensure even heat distribution.
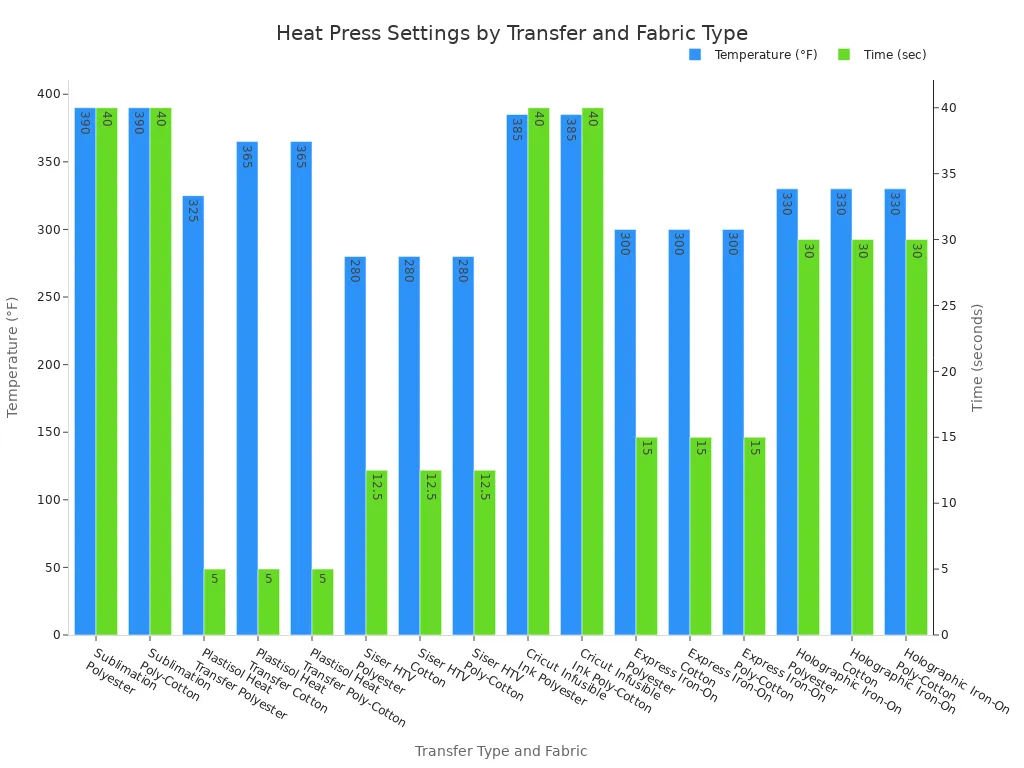
Note: The settings in the chart are a general guide. Operators should always test their specific heat press, as machine calibrations can vary. For DTF, a common starting point for cotton and poly-blends is 300–320°F (150–160°C) for 10–15 seconds with medium-firm pressure.
Step 6: The Final Peel
The peeling method depends on the type of film used: hot peel or cold peel. Each has distinct advantages and is suited for different production needs.
| Feature | Hot Peel Film | Cold Peel Film |
|---|---|---|
| Peel Timing | Immediately after pressing | After the design has fully cooled |
| Finish | Shinier, more vivid colors | Matte, smooth, premium feel |
| Durability | Moderate durability | Superior durability and wash resistance |
| Best Use Cases | Mass production, promotional apparel | High-end fashion, sportswear, detailed designs |
After peeling, a final post-press is highly recommended. An operator places a sheet of parchment paper over the design and presses it again for 5-10 seconds. This final step locks the design into the fabric fibers, softens the hand-feel, and significantly improves washability and long-term durability.
Troubleshooting Common DTF Printing Issues
Even seasoned professionals encounter issues. A systematic approach to troubleshooting is essential for maintaining quality and efficiency. This section addresses the most common problems operators face and provides actionable solutions.
Fixing Poor Ink Adhesion
Poor ink adhesion is a frequent problem where the design flakes, peels, or fails to bond with the garment. Several factors can cause this issue. Operators should investigate each potential cause to find a solution.
- Improper Adhesive Powder Application: Uneven powder coverage is a primary culprit. Too little powder leaves gaps in the adhesive layer. Too much powder can create clumps that crack after pressing.
- Low-Quality or Expired Materials: Subpar ink, powder, or film can compromise the entire process. Expired powder loses its bonding strength, while poor-quality ink may not have the correct viscosity. A defective or old transfer film also prevents proper bonding.
- Incorrect Curing and Pressing: Insufficient time or temperature during curing or pressing prevents the adhesive from activating correctly. A temperature mismatch, where the press is too hot or too cold, will result in a weak bond.
Solution Checklist:
- Verify Materials: Operators should use high-quality ink and powder from reputable suppliers. They must always check expiration dates.
- Optimize Application: Ensure the fabric is clean and pre-treated if necessary. Calibrate the printer for correct ink density and adjust curing settings based on material requirements.
- Check Press Settings: Confirm the heat press provides sufficient pressure and the correct temperature. A short press time may prevent full adhesion, while a long time can damage the transfer.
Solving Color Inaccuracy
Color inaccuracy occurs when the final print does not match the colors in the digital design file. This discrepancy can ruin an otherwise perfect print. Achieving color consistency requires careful calibration between the monitor, software, and printer.
Monitor calibration is the critical first step. If a display shows inaccurate colors, an operator cannot make precise color decisions. Professionals use calibration tools like the i1Display or Spyder to adjust brightness, contrast, and color balance.
The next step involves International Color Consortium (ICC) profiles. An ICC profile acts as a translator between devices. It ensures the colors an operator sees on-screen match the printer's output.
| Action | Tool/Method | Purpose |
|---|---|---|
| Monitor Calibration | Hardware tools (e.g., Spyder, i1Display) | Ensures the screen displays true-to-life colors. |
| Software Configuration | Adobe Photoshop, Illustrator, RIP Software | Set the color mode to CMYK and embed the correct ICC profile. |
| Printer Calibration | RIP Software, Manufacturer Utilities | Aligns the printer's output with the chosen color profile. |
RIP software plays a key role in managing these profiles. Operators can adjust color curves to fine-tune specific channels, like lowering magenta to correct reddish skin tones. Many RIP solutions, such as CADlink Digital Factory, include preset ICC profiles for popular printer models. For ultimate accuracy, an operator can use a spectrophotometer to create a custom profile tailored to their specific ink, film, and printer combination.
Dealing with Powder Clumping
Adhesive powder clumping is a frustrating issue that leads to uneven application and a flawed final print. The primary cause is environmental. Heat and moisture are the main adversaries of DTF powder.
Heads Up! ⚠️ High humidity is the number one cause of powder clumping. When the powder absorbs moisture from the air, it sticks together and forms lumps.
Operators must control their workspace environment to prevent this. Key environmental factors include:
- Temperature and Humidity: Store powder between 59–77°F (15–25°C) with humidity below 50%. Exposure to air allows moisture absorption.
- Light Exposure: Direct sunlight or strong UV light can break down additives in the powder, reducing its bonding ability.
- Contamination: Handling powder with unclean tools or wet hands introduces foreign particles and moisture.
If powder has already clumped, an operator can salvage it. The sieving method is highly effective. Gently work the clumps through a fine-mesh sieve (100-200 mesh). Any pieces that do not break down should be discarded. The recovered powder must be stored immediately in an airtight container.
Correcting Incomplete Transfers
An incomplete or patchy transfer happens when parts of the design fail to adhere to the garment. This often points to a problem with the heat press. Uneven heat or pressure is the most common reason for this failure.
- Insufficient Pressure: If pressure is too low or uneven, the adhesive cannot properly penetrate the fabric fibers. This causes the design to sit on top of the garment and peel off easily.
- Incorrect Temperature: A heat press that is too cool will not melt the adhesive thoroughly. A press that is too hot can scorch the adhesive, making it brittle and weak.
Operators should regularly test their heat press to ensure it functions correctly. A simple test can identify issues before they ruin a production run.
Pro Tip: The Business Card Test To check for even pressure, an operator can place business cards around the platen's edge. After locking down the cold press, they should try to pull the cards out. If a card moves easily, that area has a pressure issue.
For temperature, operators can use digital pyrometers or temperature strips to verify the platen's surface heat. If a test reveals a problem, the operator should first inspect the bottom platen and rubber pad for wear. A worn pad can cause uneven pressure and should be replaced. Adjusting the pressure setting slightly may also resolve the issue. Consistent testing ensures the heat press delivers reliable results for every print on dtf film.
Operators achieve professional results by mastering the six essential steps. Quality materials and consistent execution are paramount for success.
A superior print on dtf film can withstand 50+ washes, proving the value of precision. Continued practice ensures operators produce durable, high-end apparel and perfect their technique for pro-level quality.
FAQ
What is the main difference between DTF and DTG?
DTF prints onto a film for transfer to many fabrics. DTG prints directly onto cotton garments. DTF offers greater material versatility and requires no fabric pre-treatment.
Can an operator use a standard inkjet printer for DTF?
No. A standard printer lacks the specific channels for white ink. Operators need a dedicated or converted DTF printer for professional, opaque results on dark garments.
How long does a DTF print last? ⏱️
A quality DTF transfer can endure 50+ wash cycles. Proper curing and a final post-press are essential for achieving maximum durability and longevity on apparel.
See Also
Leading Precoating Materials for Advanced Filtration Systems: A 2025 Outlook
Automatic UV Coaters: Indispensable for Achieving High-Speed Printing Excellence
Innovative Folder Gluer Features Revolutionizing Carton Production Lines by 2025
Versatile Nozzle Solutions: Insights for Gardening, Bioprinting, and Lubrication Professionals
Identifying the Premier Nameplate Supplier for Your Needs in 2025