Installing an Under Sink Hot Water Dispenser A Beginner's Guide
An under sink hot water dispenser offers incredible convenience. You can successfully install one yourself, even as a beginner. The market for these dispensers is growing fast, with residential use up 15% annually. Before starting, gather your tools and check your kit parts.
⚠️ Common Mistakes to Avoid:
- Forgetting Teflon tape can cause slow leaks.
- Over-tightening fittings may crack plastic parts.
- Ignoring electrical safety, like using a GFCI outlet, is risky.
First, confirm you have the necessary tools and all the parts from your kit.
| Tools You'll Need 🔧 | Materials in Your Kit 📦 |
|---|---|
| Adjustable & Basin Wrenches | Hot Water Faucet |
| Drill with Step Bit | Water Heater Tank |
| Screwdrivers (Phillips & Flathead) | Mounting Hardware |
| Bucket & Old Towels | Water Filter & Tubing |
| Safety Glasses | Tee Adapter |
Key Takeaways
- Prepare your workspace and gather all tools and parts before you start. This includes clearing the cabinet, turning off water, and checking for a power outlet.
- Carefully install the faucet, water heater tank, and filter. Make sure to use plumber's tape correctly and avoid over-tightening fittings to prevent leaks.
- Connect the cold water supply and tubing to all parts. Fill the tank with water before plugging it in to avoid damage, and check for leaks at every connection.
Step 1: Preparation and Hardware Installation
With your tools and parts ready, you can begin the installation. This first phase focuses on preparing your space and securely mounting the main components. A careful approach here prevents headaches later.
Pre-Installation Checklist
A few final checks will ensure a smooth process.
- Clear the Cabinet: First, you need to empty everything from under your kitchen sink. This gives you a clean, open workspace. Place old towels or a shallow pan inside to catch any water drips.
- Turn Off the Water: Locate the cold water shutoff valve under your sink. Turn the handle clockwise until it stops. Then, turn on your main kitchen faucet to release any remaining pressure and confirm the water is off.
- Check Your Power Source: Your under sink hot water dispenser requires electricity. You will need a standard electrical outlet under your sink.
⚡ Electrical Safety Note: Electricians do not usually classify the under-sink area as a 'wet location'. However, for your safety, plugging into a Ground Fault Circuit Interrupter (GFCI) outlet is highly recommended. A GFCI outlet will quickly shut off power if it detects a problem, protecting you from electrical shock. If you do not have one, consider having an electrician install one.
Mounting the Faucet
Your new hot water faucet needs a place on your sink or countertop. Many sinks have an extra, pre-drilled hole covered with a cap, often intended for a soap dispenser or sprayer.
- Using an Existing Hole: If you have a spare hole, remove the cap. Most hot water dispensers require a 1 3/8-inch diameter hole. You should check if your existing hole meets this standard size, which is common for many dispensers and faucets from leading brands.
- Drilling a New Hole: If you do not have a spare hole, you will need to drill one. This is the most challenging part of the installation.
⚠️ Drilling Countertops: Proceed with Caution! Drilling into countertops, especially stone like granite, is difficult and risky. Mistakes are permanent.
- For Stainless Steel: Use a step bit designed for metal. Apply steady pressure and use cutting oil to keep the bit cool.
- For Granite/Stone: This task requires a diamond core drill bit and water to prevent cracking. Always drill wet. You can create a small dam with plumber's putty and fill it with water. Start drilling at a slight angle to create a groove, then slowly bring the drill upright. It is often best to hire a professional fabricator for this, as they have the right tools and experience.
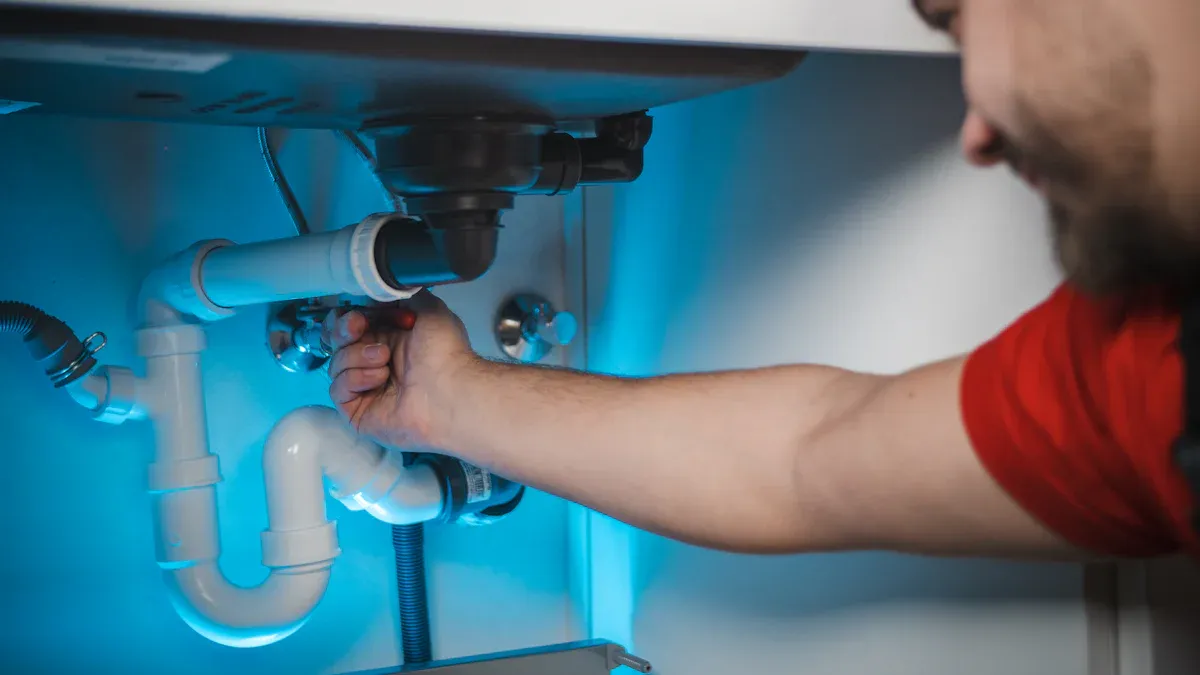
Once you have a hole, you can install the faucet. Clean the sink surface thoroughly. Apply a bead of 100% silicone sealant around the base of the faucet to create a waterproof seal. This simple step prevents water from seeping under the counter and causing damage. From below the sink, slide the washer and thread the mounting nut onto the faucet shank. Hand-tighten it, then use a basin wrench to give it a final quarter-turn. Do not over-tighten.
Mounting the Water Heater Tank
The water heater tank is the heaviest component. A full tank can weigh around 225 pounds, so its placement is critical for safety and stability.
You should find a flat, level spot on the cabinet floor for the tank. Do not hang the tank from the cabinet walls, as they are not designed to support that much weight.
- Position the tank in a convenient location. It should be close enough for the tubing to reach the faucet and the filter.
- Ensure you leave enough clearance around the unit for air to circulate. Your instruction manual will provide the specific clearance dimensions required for ventilation.
- Use the provided screws and brackets to secure the tank to the back or side wall of the cabinet. This prevents it from tipping over.
Mounting the Filter Cartridge
The water filter ensures your instant hot water is clean and tastes great. Proper installation is key to its performance.
- Choose a spot on the cabinet's back or side wall for the filter head. It should be easily accessible so you can change the cartridge later.
- Use the provided screws to mount the filter head securely. Make sure you orient it correctly according to the "in" and "out" flow arrows.
- Attach the filter cartridge to the head. Most cartridges twist and lock into place with a simple quarter-turn. You should feel a click when it is properly seated.
Pro Tip: Avoid Filter Failure An incorrectly installed filter can cause problems. Watch for these signs:
- High Water Pressure (PSI): A sudden spike in your system's pressure often means the filter is clogged or the wrong size was installed.
- Crushed Cartridge: If the filter looks like a crumpled can, its inner core has likely failed. This can happen if you use a cartridge that is the wrong size for your system.
- Cracked End Caps: Brittle plastic on the top or bottom of the filter can break, sending small pieces into your plumbing.
Step 2: Connecting and Activating Your Under Sink Hot Water Dispenser
You have successfully mounted the hardware. Now you will connect the plumbing and bring your new appliance to life. This phase involves linking all the components and carefully checking your work before you flip the switch.
Connecting the Cold Water Supply
Your dispenser heats cold water, so the first connection you will make is to your cold water supply line. You will use the tee adapter included in your kit for this task. Tee fittings are T-shaped parts that let you split the flow of water from one pipe into two. This allows you to send cold water to both your main faucet and your new hot water dispenser.
- Shut Off Water: Double-check that the cold water shutoff valve is still firmly closed (turned clockwise).
- Disconnect the Line: Place a bucket under the cold water line. Use an adjustable wrench to disconnect the flexible hose that runs from the shutoff valve to your main kitchen faucet. Some water will drip out.
- Install the Tee Adapter: This is where you will need plumber's tape to prevent leaks.
How to Use Plumber's Tape Correctly 💧
- Clean the Threads: First, wipe the male threads on the shutoff valve with a cloth. You need a clean surface for the tape to stick properly.
- Wrap Clockwise: Take your plumber's tape and wrap it around the threads in a clockwise direction. This prevents the tape from unraveling when you screw on the fitting.
- Apply the Right Amount: You should apply two to three wraps of tape. Make sure you cover all the threads completely. Pull the tape taut as you wrap, then snap it off.
- Attach the Adapter: Screw the tee adapter onto the shutoff valve and hand-tighten it. Then, use your wrench to give it another quarter-turn. Reconnect your main faucet's cold water hose to one side of the tee adapter.
Connecting Tubing to All Components
Now you will run the flexible tubing to connect everything. Your kit likely uses quick-connect fittings, which are designed for easy, tool-free installation.
- Cut Tubing to Length: Measure and cut the tubing for each connection. You will need lines running from the tee adapter to the filter inlet, from the filter outlet to the tank inlet, and from the tank outlet to the faucet. Keep the lines as straight as possible and avoid sharp bends or kinks.
- Make Clean Cuts: Use a sharp utility knife or a tube cutter to make straight, clean cuts. A clean cut is essential for a leak-proof seal.
- Push to Connect: To make a connection, you simply push the tubing firmly into the fitting. You should feel it click or stop once it is fully seated. Give the tube a gentle tug to confirm it is locked in place.
⚠️ Warning: Do Not Over-tighten Fittings! If your kit uses compression fittings with nuts, be very careful. Over-tightening can cause serious damage.
- It can strip the threads on the nut.
- It can crush the small ring (ferrule) inside that creates the seal.
- It can even crack the fitting body itself, causing a leak.
Tighten these fittings until they are snug, then give them an extra quarter-turn with a wrench. That is usually enough.
Checking for Leaks
This is the most important check. A small drip can cause major water damage over time. You must find and fix any leaks before you plug in the unit.
First, know the common trouble spots. Leaks often happen at connection points.
- The tee adapter connection to the main water line.
- The tubes and hoses connecting the filter, tank, and faucet.
- The base of the new faucet if the seal is not tight.
Now, you can perform a systematic check.
- Turn On Water Slowly: Go to your cold water shutoff valve. Turn the handle counter-clockwise just a little bit. You should hear water start to fill the lines.
- Listen and Look: Listen for any hissing sounds. Use a flashlight and a dry paper towel to inspect every single connection you made. Wipe each fitting with the paper towel. If the towel comes away wet, you have found a leak.
- Find the Source: Water drips down. The highest point of wetness is the true source of the leak.
- Fix Drips: If you find a leak, turn the water off immediately. For a quick-connect fitting, push the tube in further to ensure it is seated. For a threaded fitting, you may need to tighten it slightly or re-apply plumber's tape.
Filling the Tank and Powering On
You must fill the tank completely with water before you plug it in. Powering on an empty tank will destroy the heating element instantly. This is the final step for activating your under sink hot water dispenser.
- Open the Faucet: Press and hold the handle on your new hot water faucet.
- Fully Open the Valve: Turn the cold water shutoff valve all the way on (fully counter-clockwise).
- Bleed the Air: Water will begin to fill the tank. At first, you will hear gurgling sounds and air will sputter from the faucet. This is normal. Keep the faucet handle open until you get a steady, air-free stream of water. This process bleeds all the air out of the system. It may take a few minutes.
- Final Leak Check: With the system now under full pressure, perform one last leak check on all connections.
- Power On: Once you are certain there are no leaks and the tank is full, you can plug the power cord into the GFCI outlet. The indicator light on the tank should turn on, showing that it is heating.
Your under sink hot water dispenser will take about 10-15 minutes to heat the water to the preset temperature.
Congratulations! You followed the key phases to install your under sink hot water dispenser. Enjoy the convenience, which uses about as much energy as a 25W bulb. You have gained a valuable DIY skill.
Keep it Running Smoothly: 🛠️ Remember to flush the unit occasionally to remove sediment.
Now you are ready for other projects, like fixing a leaky faucet!
FAQ
How often should I change the water filter?
You should replace your filter cartridge every six months. This schedule ensures optimal performance and clean water. Check your user manual for specific model recommendations.
What if my water is not getting hot?
First, check that the tank is plugged into a working GFCI outlet. Confirm the indicator light is on. Some units have a reset button you can press.
Can I adjust the water temperature? 🌡️
Yes, most models have a thermostat dial on the tank. You can turn it to set your desired temperature. The typical range is from 160°F to 210°F.