The Ultimate Hack for Applying DTF Film for T Shirts
The secret to a professional, long-lasting DTF application is a two-press method. An initial press adheres the dtf film for t shirts to the garment.
Key Technique: After peeling the film, a second press locks in the design. This final step creates maximum durability and a soft, retail-quality feel for any project.
The Application Process for DTF Film for T Shirts
A successful application begins with methodical preparation. Following these initial steps ensures the dtf film for t shirts adheres correctly, creating a flawless foundation for the final product. Each stage, from gathering supplies to the first press, plays a critical role in the outcome.
Step 1: Gather Your Supplies
Proper preparation requires having all necessary tools and materials ready. A well-organized workspace prevents errors and streamlines the application process. For creators producing their own transfers from scratch, the list is more extensive.
- Heat Press Machine: This is essential for applying consistent heat and pressure.
- PET Transfer Film: The design is printed onto this specialized transparent film.
- DTF Adhesive Powder: This powder melts during pressing, bonding the ink to the fabric.
- DTF Printer & Inks: A dedicated printer with CMYK and white inks is needed for in-house production. Alternatively, one can order pre-printed transfers.
Additional accessories ensure a clean and professional application.
- Teflon or Parchment Sheets: These protect the heat press platen and the garment.
- Lint Roller: It removes fibers and dust from the shirt for better adhesion.
- Heat Press Pillows: These help apply even pressure around seams, collars, or zippers.
- Small Brush: This is useful for removing any excess adhesive powder before curing.
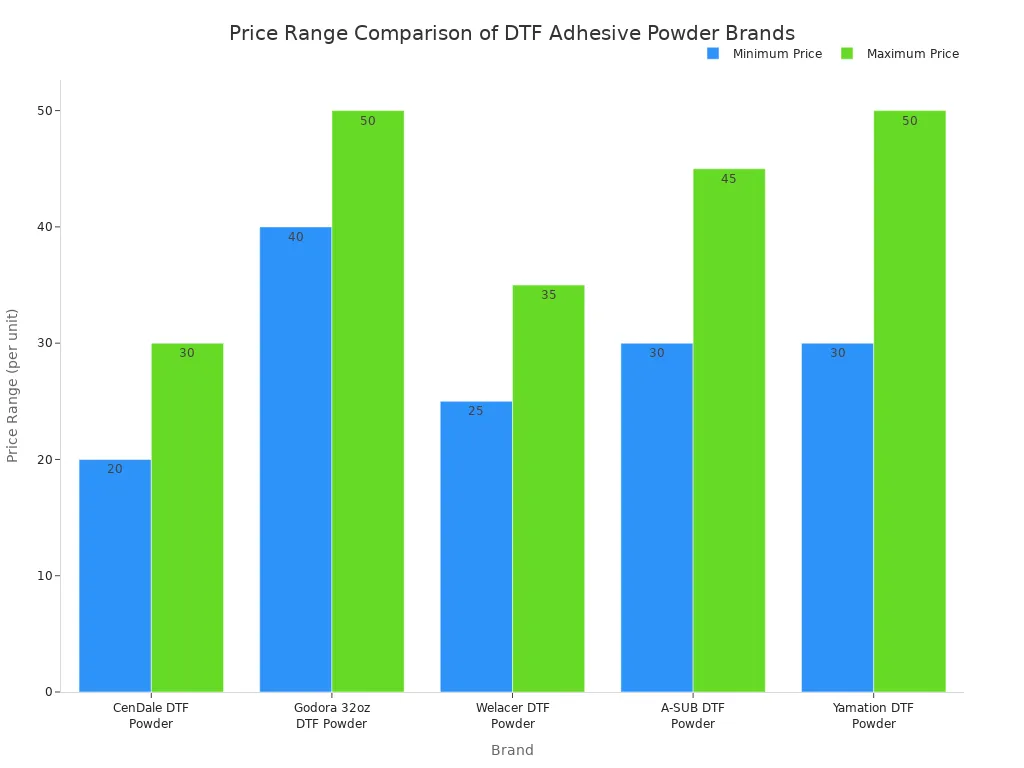
The quality of the adhesive powder directly impacts the final print's durability and feel. Different brands offer unique features, and selecting the right one is crucial. The table below compares several popular options available on the market.
| Brand | Key Features | Price Range (per pound) |
|---|---|---|
| CenDale DTF Powder | Vibrant colors, impressive durability, enhanced adhesion, soft touch finish, compatible with multiple fabrics (cotton, polyester, blends), works well on dark textiles. | $20-$30 |
| Godora 32oz DTF Powder | Versatile, excellent adhesion, prevents sticky prints, reduces white ink use, vibrant and durable prints, suitable for diverse printing needs. | $40-$50 (for 32oz) |
| Welacer DTF Powder | Strong adhesion, vibrant colors, long-lasting prints, works with various materials, compatible with different application methods, offers flexibility during fabric movement without cracking. | $25-$35 |
| A-SUB DTF Powder | Produces vibrant and long-lasting prints, excellent adhesion, resists fading, minimizes cracks, works on cotton and polyester blends, requires precise temperature control (320-340°F). | $30-$45 |
| Yamation DTF Powder | Exceptional adhesion, vibrant results, maintains print vibrancy after washes, offers consistent vivid colors, sharp details due to fine particle size, works well on various fabric types, resists peeling. | $30-$50 |
Step 2: Set Your Heat and Prepare the Shirt
Correct temperature and a well-prepared garment are non-negotiable for a strong bond. First, set the heat press to the temperature recommended by the transfer film or powder manufacturer. A common starting point is 300-325°F (148-163°C).
Pro Tip: Always pre-press the T-shirt for 5-7 seconds. This simple action removes hidden moisture and wrinkles from the fabric, creating a perfectly flat and dry surface for the transfer to adhere to.
After pre-pressing, use a lint roller to thoroughly clean the application area. Any stray fibers, dust, or debris can interfere with adhesion and create imperfections in the final design.
Step 3: Position the Transfer
Careful placement is key to a professional-looking shirt. Lay the garment flat on the heat press platen. Place the dtf film for t shirts onto the shirt with the ink side facing down. The design should be visible through the clear film.
Take a moment to ensure proper alignment. A T-shirt guide or ruler can help center the design accurately. For a standard chest placement, a good rule of thumb is to position the top of the design about three inches below the collar. Double-check that the transfer is straight and exactly where it needs to be before proceeding.
Step 4: The First Press
This initial press adheres the ink and adhesive to the fabric fibers. Once the transfer is positioned correctly, cover it with a Teflon or parchment paper sheet. This sheet protects both the garment and the heat press's upper platen from direct contact with the film.
Close the heat press and apply firm, even pressure. Press the transfer for the recommended duration, typically between 10 and 15 seconds. The combination of heat, pressure, and time works to melt the adhesive powder, bonding the design from the film to the T-shirt. Once the time is up, open the press carefully. The next critical steps involve cooling and peeling the film.
Ensuring a Perfect and Lasting Finish
The initial press is only half the battle. The steps that follow—peeling, final pressing, and proper care—are what transform a good application into a great one. This phase is where the "hack" of the two-press method truly reveals its value, creating a durable, soft, and professional-grade product.
Step 5: The Cold Peel Technique
Patience is paramount after the first press. The term "cold peel" means the transfer film must cool completely to room temperature before removal. Attempting to peel the film while it is still warm or hot can lead to a failed transfer, with parts of the design lifting or sticking to the film.
Important Note: Set the T-shirt aside on a flat, clean surface after the first press. Allow it to cool for several minutes. A creator can test the temperature by touching a corner of the film. It should feel cool, not warm.
Once the transfer is completely cool, begin peeling the film. Start at one corner and pull the film back slowly and smoothly at a low angle. The design should remain perfectly adhered to the garment. If any part of the design begins to lift, stop immediately. The user can lay the film back down, cover it with a Teflon sheet, and press it again for a few more seconds to re-adhere the problem area before letting it cool once more.
Step 6: The Final Durability Press
This second press is the ultimate secret to achieving a professional, long-lasting finish. It locks the design into the fabric, enhances durability, and improves the texture from a plastic-like feel to a soft, matte finish.
After successfully peeling the film, place the T-shirt back on the heat press. Cover the exposed design with a Teflon sheet or a piece of parchment paper. This protective layer is crucial; it prevents the ink from sticking to the heat platen and gives the design its final texture. Press the shirt again for 5-10 seconds using the same temperature and firm pressure.
This final press does more than just flatten the design. It provides several key benefits for the dtf film for t shirts application:
- It allows the thermoplastic polyurethane (TPU) adhesive to fully penetrate and wrap around the fabric threads. This action ensures uniform adhesion and significantly reduces the risk of edge lifting or peeling over time.
- The pressure helps collapse any microscopic air pockets and settles uneven areas within the ink layer, solidifying the bond between the design and the fabric.
- This step aids in the annealing process. During this process, the TPU polymer chains organize into a more stable, semi-crystalline structure. This structural change enhances the print's flexibility, resistance to washing, and overall long-term durability.
Step 7: Aftercare and Washing
Proper aftercare preserves the vibrancy and integrity of the DTF design. The first 48 hours are the most critical for the ink and adhesive to set permanently.
A user must wait 24-48 hours after application before the first wash. This waiting period allows the adhesive to fully cure and bond with the fabric fibers, ensuring maximum longevity.
When it is time to wash the garment, follow these guidelines for the best results:
- Turn the garment inside out. This minimizes friction and direct abrasion on the design during the wash cycle.
- Wash in cold water. Hot water can degrade the adhesive and cause colors to fade. Use a mild detergent.
- Use a gentle wash cycle. Avoid heavy-duty cycles that can stretch or stress the fabric and the print.
Drying requires just as much care as washing. High heat is the primary enemy of a DTF print.
- Air drying is the best choice for DTF-printed garments. Lay the T-shirt flat or hang it to dry. Turning it inside out while it dries can also protect the design from direct sunlight, which may cause fading.
- Avoid heat-based drying. High heat from a tumble dryer can cause cracking, peeling, or total design failure.
- Skip the dryer sheets. The chemicals in many dryer sheets can interfere with the DTF adhesive and weaken the bond.
If issues arise after washing, they often trace back to heat or friction. Common problems include cracking or peeling prints, which result from excessive heat exposure, and dull or fading colors, which are often caused by using hot water or drying on high heat.
The two-press method is the ultimate hack for professional results. A creator achieves success by mastering a few critical steps. These include pre-pressing the garment, executing a proper cold peel, and performing the final durability press. This process ensures every dtf film for t shirts application is durable and high-quality.
FAQ
What if the design lifts during the cold peel?
A user should stop peeling immediately. They can lay the film back down, cover it with a Teflon sheet, and press again for 5-7 seconds before re-cooling the garment.
Can a home iron substitute for a heat press?
A home iron can work for small projects. A user must apply firm, even pressure and move the iron constantly. A heat press provides superior, consistent results for professional applications.
Why is the final press necessary?
The final press locks the design into the fabric fibers. It enhances durability, improves wash resistance, and creates a soft, professional matte finish for the dtf film for t shirts. ✅
See Also
Automatic UV Coaters: Indispensable for Modern High-Volume Printing Operations
WT20 Thoriated Tungsten Electrodes: Enhancing TIG Welding Performance and Efficiency
Leading Precoating Materials Revolutionizing Filtration Systems for Optimal Performance in 2025
Innovative Folder Gluer Features Shaping 2025 Carton Production Lines
Cutting-Edge Materials Transforming the Future of Heat Exchanger Manufacturing