Your Ultimate 2026 Guide to Fiberglass Drywall Joint Tape
You can build a powerful defense against drywall cracks. Fiberglass Drywall Joint Tape creates a durable, flexible bond over every seam. This bond effectively resists stress from building movement and humidity changes. To achieve this superior strength, pairing a premium product like FIBERGLASS MAX Tape with the right compound is essential for your project's success.
Pro Tip: Always use a setting-type joint compound, also known as "hot mud," for the critical first coat. This chemical reaction creates the strongest possible foundation for a lasting, crack-free finish.
Key Takeaways
- Fiberglass tape helps stop drywall cracks. It makes a strong bond over seams.
- Fiberglass tape is better than paper tape. It is stronger and stops mold.
- Always use "hot mud" for the first coat. This makes the tape stick very well.
- Clean the wall before you put on the tape. This helps the tape stick best.
- Apply the tape and mud carefully. This makes a smooth, crack-free wall.
Why Choose Fiberglass Tape for Crack Prevention?
Your walls face constant stress that can lead to unsightly cracks. Understanding these forces is the first step toward preventing them. Fiberglass tape offers a superior defense against these common structural issues.
Unmatched Strength and Mold Resistance
Buildings are not static; they expand, contract, and settle over time. These movements create stress on your drywall seams. Key causes include:
- Temperature and Humidity: Materials swell in high humidity and shrink in dry conditions, stressing joints.
- Structural Settling: A home naturally settles into its foundation, creating tension around corners, doors, and windows.
- Seasonal Changes: Wood framing and other materials can dry out and shift, leading to minor cracks.
Fiberglass tape is engineered to withstand these forces. Its inorganic composition also gives it a powerful advantage in damp environments. Unlike paper, fiberglass does not feed mold and is inherently water-resistant, making it the ideal choice for bathrooms, basements, and kitchens.
Fiberglass vs. Paper Tape: A Head-to-Head Comparison
When choosing a tape, you need to compare performance. While paper tape is a traditional option, fiberglass offers distinct advantages in speed and durability, especially for modern construction.
| Feature | Fiberglass Tape | Paper Tape |
|---|---|---|
| Application | Self-adhesive for faster application | Requires a bedding coat of mud |
| Moisture | Inherently mold and moisture resistant | Can degrade or bubble if exposed to moisture |
| Ease of Use | Easier for DIYers; no pre-bedding needed | Requires more skill to avoid bubbles |
| Strength | Higher ultimate load strength | Creates a rigid, non-elastic joint |
Did You Know? The self-adhesive nature of fiberglass tape can significantly reduce labor time, making it a cost-effective choice for both professionals and weekend warriors.
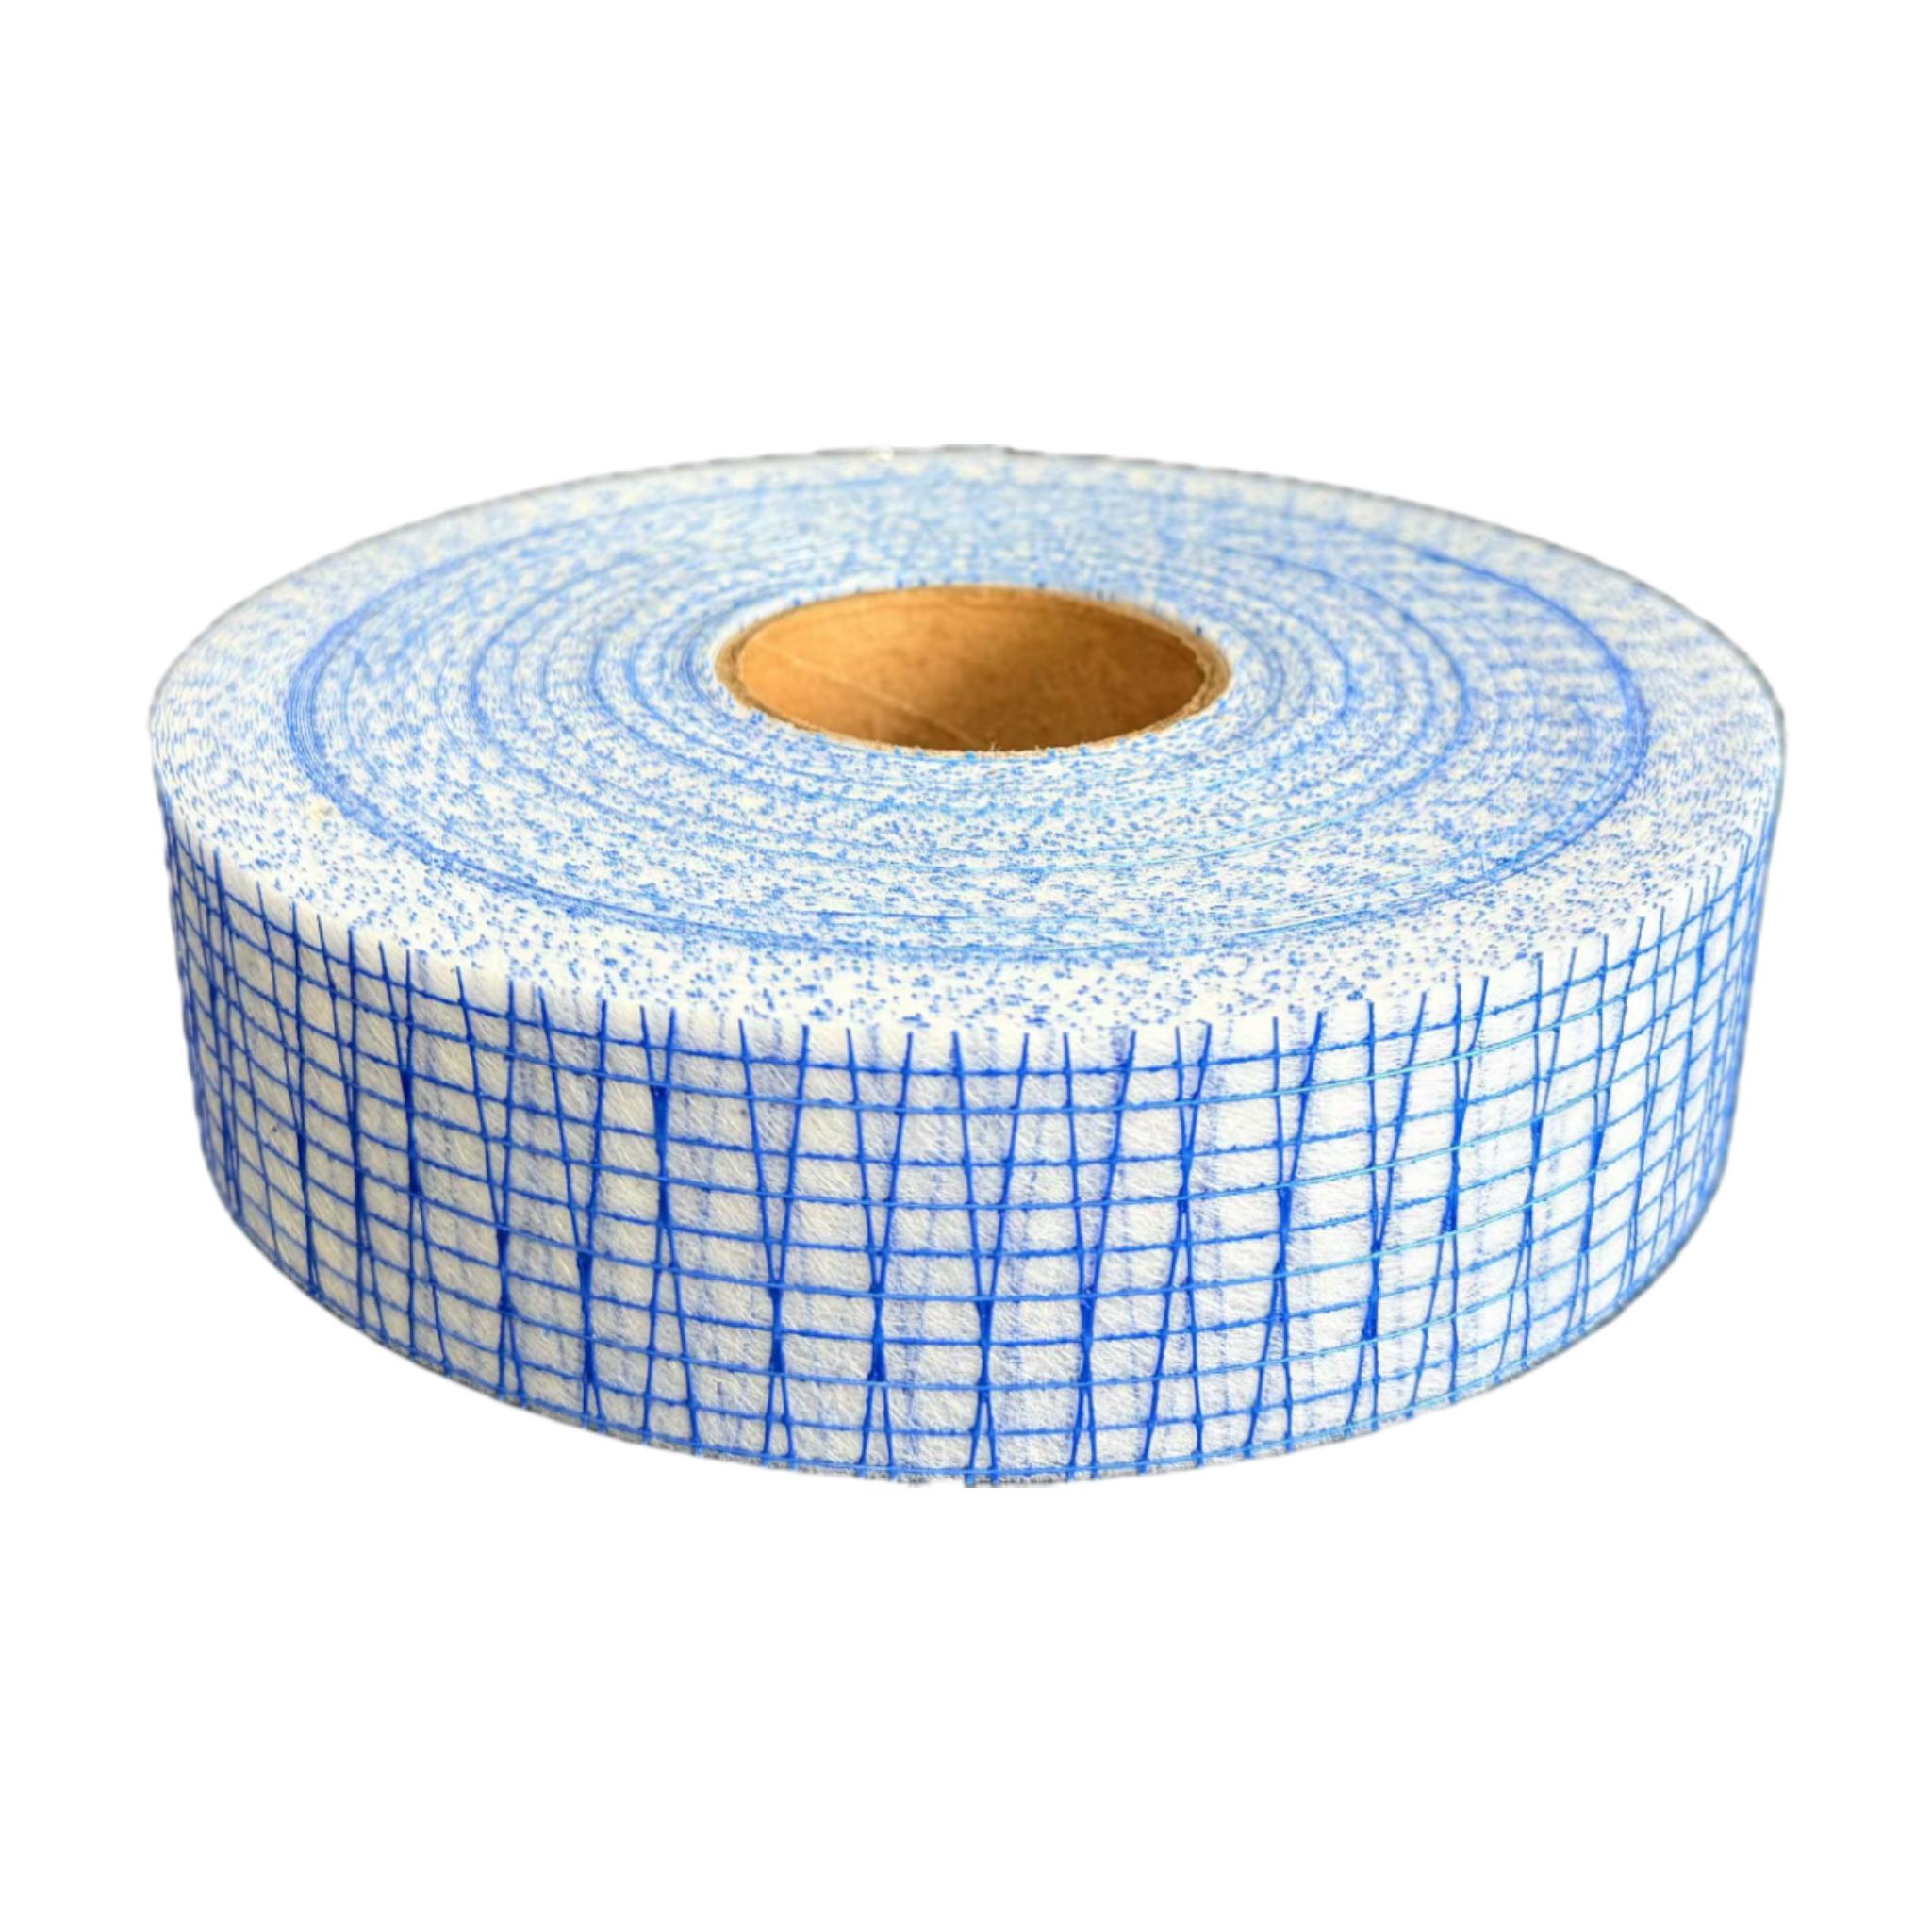
Introducing RUIFIBER FIBERGLASS MAX Tape
To achieve a truly professional finish, you need a premium product. The RUIFIBER FIBERGLASS MAX tape is a revolutionary Fiberglass Drywall Joint Tape designed for superior performance. Its paperless, reinforced construction provides exceptional crack resistance and eliminates the bubbling and tearing common with other tapes. Crafted from durable Polyvinyl Chloride or Polyethylene, its distinctive blue mesh signifies advanced quality and strength. This tape conforms seamlessly to joints, ensuring a flawless, long-lasting finish for your most demanding drywall projects.
How to Apply Fiberglass Drywall Joint Tape for a Crack-Free Finish
A professional, crack-free finish depends on proper technique. You can master the application of fiberglass tape by following a systematic process. This guide breaks down each step, ensuring you create a strong, durable bond that lasts for years.
Essential Tools and Materials You'll Need
You should gather all your tools and materials before you begin. This preparation ensures an efficient and uninterrupted workflow. A well-equipped workspace is the first step toward a professional result.
- RUIFIBER FIBERGLASS MAX Tape
- Setting-Type Joint Compound (Hot Mud)
- Mixing Pan and Putty Knife (for mixing compound)
- Utility Knife or Scissors
- Safety Glasses and Dust Mask
- Joint Knives: You will need various sizes (e.g., 6-inch, 10-inch, 12-inch) for applying and feathering the joint compound over the seams.
- Drywall Banjos: This semi-automatic tool applies compound and tape at the same time, greatly speeding up work on flat joints.
- Automatic Taper (Bazooka): For large projects, this professional tool applies, cuts, and beds the tape in one fluid motion, offering maximum efficiency.
Step 1: Prepare the Surface for Maximum Adhesion
Your tape’s adhesive backing requires a clean, stable surface to create a powerful bond. You must remove all drywall dust, debris, and loose paper from the seams and surrounding areas. A shop vacuum or a damp cloth works perfectly for this task. Inspect the joints for any protruding screw heads and drive them slightly below the drywall surface.
Optimal Working Conditions For the best adhesion and compound curing, you should control your environment. Maintain a room temperature between 50-75°F (10-24°C) and keep humidity levels between 40-60%. These conditions prevent the tape from failing and the compound from drying too quickly or slowly.
Step 2: Center and Apply the Self-Adhesive Tape
With a clean surface, you are ready to apply the tape. The self-adhesive nature of Fiberglass Drywall Joint Tape makes this step straightforward.
Start at one end of a seam. Unroll the tape and press it firmly onto the joint. Your primary goal is to keep the tape perfectly centered over the seam along its entire length. Use your fingers or a flexible putty knife to smooth the tape down, ensuring there are no wrinkles or air pockets. Cut the tape cleanly at the end of the joint with a utility knife.
To guarantee perfect alignment, you can use these professional techniques:
- Feel for the Seam: As you apply the tape, run your thumb along its center. You can feel the recessed seam through the mesh, which helps you guide the tape accurately.
- Create a Reference Line: If you have trouble seeing the seam, use the edge of a taping knife to score a light, temporary line in the drywall. This gives you a visible guide to follow.
- Press Firmly: A strong initial bond is critical. Go back over the entire length of the applied tape and press it down one more time to secure the adhesive.
Step 3: Embed the Tape with Setting-Type Compound
This step creates the chemical bond that gives your joint its incredible strength. You will mix and apply a setting-type compound (hot mud) to permanently lock the tape in place.
First, you must mix your compound correctly. The water-to-powder ratio is critical for achieving the right consistency. A good starting point is about 10 ounces of water for every pound of dry compound.
Mixing for Success 🥣 You can achieve a perfect, lump-free mix by following these steps:
- Pour approximately 5-6 quarts (4.7-5.6 liters) of clean, cool water into a mixing pan.
- Gradually add one bag of setting-type compound to the water.
- Mix the compound for about one minute, scraping the sides of the pan until the mixture is smooth. You can add a little more water if needed and remix.
With your compound mixed, you can begin the embedding process. Use a 6-inch taping knife to apply a generous coat of the hot mud directly over the tape. You want to force the compound through the mesh of the Fiberglass Drywall Joint Tape and into the seam below. Apply a thin coat about 1/8 inch thick, extending it 4-5 inches wide. Hold your knife at a firm angle and apply enough pressure to fill the joint completely, but do not apply so much pressure that you remove most of the compound.
After applying the mud, you must let it cure. The "setting time" is the period required for the compound to harden chemically before you can apply the next coat. This time varies by product.
| Product Type | Setting Time (minutes) |
|---|---|
| Quick Set Lite 5 | 5 |
| Quick Set Lite 20 | 20 |
| Quick Set Lite 45 | 45-70 |
| Quick Set Lite 90 | 90 |
| Quick Set Lite 210 | 210 |
Choose a product that matches your working speed. Once the compound is hard to the touch, you are ready for the next step.
Step 4: Apply and Feather the Final Coats
Your final coats will hide the tape and blend the joint seamlessly into the wall. This process involves applying thinner layers of compound and "feathering" the edges. Feathering is a technique that creates a smooth, tapered transition from the joint to the drywall surface, making the repair invisible after painting.
For your second coat, you can switch to an all-purpose or topping compound, which is easier to sand. Use a wider, 10-inch or 12-inch taping knife. Apply a thin coat of compound over the initial coat, extending it a few inches beyond the edges of the first layer. Hold the knife at a low angle and pull it smoothly across the joint. The goal is to fill any imperfections and build up the surface slightly.
Pro Feathering Techniques To create an invisible transition, you can use these professional methods:
- Use progressively larger drywall knives for each coat. This naturally feathers the edges outward.
- Apply thinned compound with a small roller for wide joints, then smooth it with a 12-inch knife.
- For inside corners, coat one side at a time to avoid tool marks. Apply just enough mud to hide the tape and feather the outer edge.
After the second coat dries completely (this can take up to 24 hours for air-drying compounds), you can apply a final skim coat. Use your 12-inch knife to apply a very thin layer of compound, again extending the feathered edge. This final coat fills any minor scratches or pinholes.
Once the final coat is fully dry, you can perform the final sanding. Proper sanding creates the ultimate smooth surface for priming and painting.
- Initial Sanding: Start with 100-grit sandpaper on a sanding block or pole sander. Keep the sander flat against the wall to knock down any high spots or ridges.
- Feathering the Edges: Lightly sand the outer edges of the compound to blend them perfectly into the drywall. Be careful not to oversand and expose the tape mesh.
- Final Polish: For the smoothest finish, go over the entire area with a fine 220-grit sandpaper. This will remove any minor scratches left by the coarser grit.
Always wear a dust mask during sanding. After sanding, wipe the surface with a damp cloth to remove all dust before you begin priming.
Advanced Tips and Troubleshooting
Even with the best materials, you can encounter challenges. Mastering a few advanced techniques will help you troubleshoot common issues and handle difficult areas like a seasoned professional. This ensures your finish remains flawless under scrutiny.
Handling Challenging Inside Corners and Butt Joints
Butt joints, where two non-tapered drywall ends meet, can create a noticeable hump if not handled correctly. You can create a flatter, more invisible joint by preparing the surface first.
- Use a shallow back-bevel on the joint to create a recess for the tape and mud.
- Consider using pre-beveled butt-board on long runs to simplify the process.
For inside corners, precision is key. Apply your tape and first coat of mud to one side of the corner. Let it set completely before you coat the adjacent side. This method prevents your taping knife from gouging the wet compound on the opposite wall, giving you a crisp, clean corner line.
How to Fix Bubbles and Visible Tape Mesh
Air bubbles and visible tape mesh are two of the most common finishing frustrations. A lack of joint compound is the primary cause of bubbles. If you find a bubble after the mud has set, you can easily repair it.
- Cut the bubble out with a sharp utility knife.
- Apply a thin coat of compound over the cutout area.
- Place a new piece of tape over the fresh compound and press it in firmly.
- Feather two more thin coats over the patch, allowing each to dry.
Because the mesh has a texture, it will leave a rough surface unless the first coat of compound completely covers it.
To prevent the mesh pattern from showing through your paint, you must fully embed the Fiberglass Drywall Joint Tape in the first coat. If you sand too aggressively and expose the mesh, apply another thin skim coat to hide it before priming.
Choosing the Right Compound for Each Coat
Your choice of compound directly impacts your project's speed and final quality. The two main types, setting-type and drying-type, serve different purposes.
| Feature | Setting-Type (Hot Mud) | Drying-Type (All-Purpose) |
|---|---|---|
| Hardening | Chemical reaction; fast setting | Evaporation; slower drying |
| Strength | Superior bond, less shrinkage | Softer, more shrinkage |
| Sanding | Harder to sand | Easier to sand |
| Best Use | First coat (embedding tape) | Fill and finish coats |
For the strongest foundation, always use a setting-type compound for your first coat. For your second and final coats, you can switch to a lighter, all-purpose or topping compound. These are easier to sand and help you achieve an ultra-smooth finish.
You can achieve a durable, professional finish that resists cracks. The combination of fiberglass tape and a setting-type compound offers the most reliable method. Your success hinges on mastering the fundamentals and avoiding common errors.
For a flawless result, you must:
- Start with a clean, dust-free surface for maximum adhesion.
- Press the tape firmly onto the seam to prevent wrinkles.
- Use setting-type compound (hot mud) for the first coat to fully embed the tape and create the strongest possible bond.
FAQ
Can I use all-purpose compound for the first coat?
You should always use a setting-type compound (hot mud) for the first coat. This chemical-setting mud creates the strongest bond with the fiberglass mesh. All-purpose compound lacks the necessary strength and can lead to cracks over time.
What happens if I don't clean the drywall surface first?
Drywall dust prevents the tape's adhesive from sticking properly. You risk the tape lifting or bubbling, which weakens the joint. A clean surface ensures maximum adhesion and a durable, professional finish for your project.
Is fiberglass tape better for ceiling joints?
Yes, fiberglass tape offers excellent strength for ceiling joints, which face significant stress from gravity and structural movement. Its self-adhesive nature also simplifies the overhead application process, making your work faster and easier.
Why is the RUIFIBER FIBERGLASS MAX tape blue?
The distinctive blue color of RUIFIBER FIBERGLASS MAX tape signifies its premium, reinforced construction. It helps you easily identify the product on the job site and confirms you are using an advanced tape engineered for superior crack resistance and durability.
See Also
Silicone Sealant: The Unsung Hero of Modern Home Construction and Decor
Mastering Pass Partition Plate Welding: Expert Techniques for 2025
Auto Reinforcement: A Beginner's Guide to Frame Plate Kits
Homeowner's Guide: Perfectly Matching Hinge Finishes With Door Hardware