DIY DTF Transfers with an Inkjet Printer A 2026 Guide
Hobbyists and small businesses can create direct-to-film transfers using a modified inkjet printer. This method requires specific consumables, including specialized inks, adhesive powder, and a quality dtf film for inkjet printer. Achieving professional results depends on the printer conversion, diligent white ink maintenance, and precise curing of the transfer.
Key Takeaways
- You need special tools for DIY DTF printing. These include a changed inkjet printer, a heat press, and special software. These tools help make good transfers.
- Making DTF transfers has many steps. You must prepare your design, print it on film, add powder, and then heat it. Each step is important for a good final product.
- DIY DTF printing saves money over time. But, it needs a lot of work and care. You must clean the printer often to keep it working well.
Essential Equipment for Inkjet DTF
Assembling the right equipment is the foundation of a successful DIY DTF operation. Users need a converted printer, a dependable heat press, and specialized software to manage the unique printing process. Each component plays a critical role in producing high-quality, durable transfers.
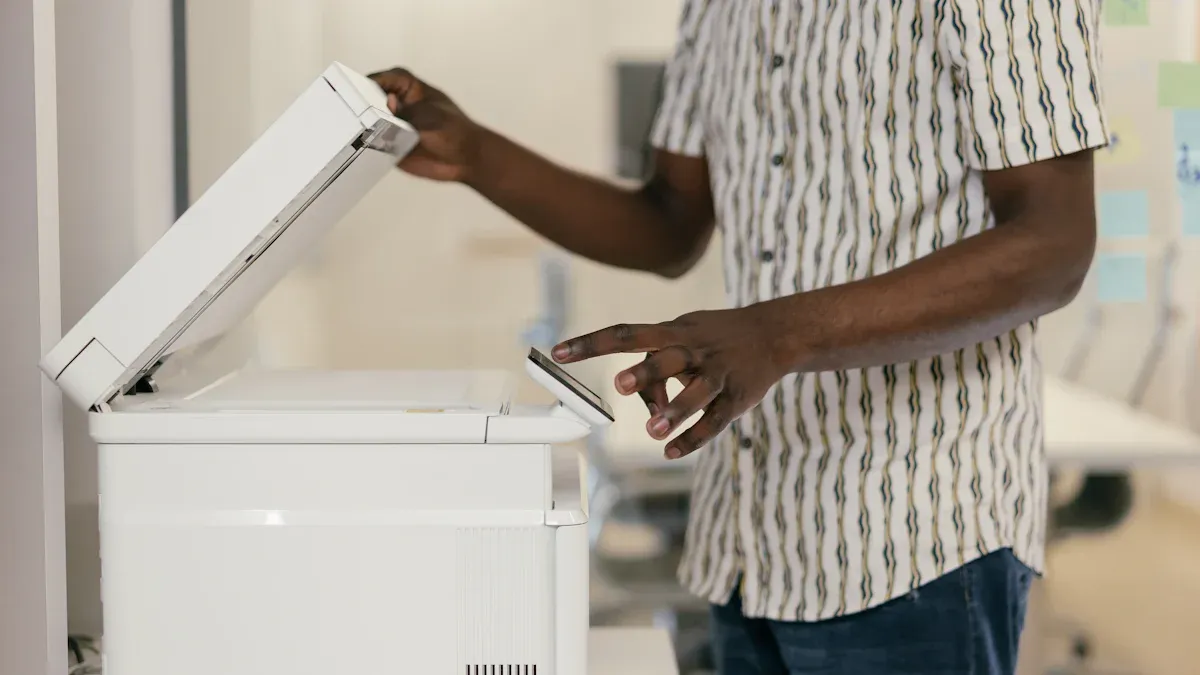
The Modified Inkjet Printer
A standard office inkjet printer cannot directly handle DTF printing. Users must first select and convert a compatible model. Certain printers are favored for their reliability and features.
- Epson EcoTank Series (ET-2720, ET-4750): These are popular due to their built-in continuous ink systems, which simplify ink management.
- Epson SureColor Series (P400, P600): Professionals often choose these for their exceptional print quality and durability.
- Canon PIXMA Pro Series (Pro-100): This model delivers excellent image quality suitable for highly detailed designs.
The conversion process involves several technical steps:
- Obtain a DTF conversion kit compatible with the chosen printer model.
- Disassemble the printer to access the ink delivery system.
- Install the new DTF ink system and cartridges.
- Install the required RIP software to manage print jobs.
- Reassemble the printer and perform test prints to calibrate settings.
A Reliable Heat Press
A quality heat press is crucial for curing the adhesive powder and bonding the transfer to the fabric. Inconsistent heat or pressure leads to poor adhesion and fading. A reliable press must have:
- Flat, even platens that distribute heat uniformly.
- Accurate and stable temperature controls.
- Consistent pressure across the entire surface.
Pro Tip: Use a thermal temperature gun to check the platen for cold spots. This ensures the entire design receives the correct amount of heat during the curing and pressing stages.
RIP Software (AcroRIP, CADlink)
Raster Image Processor (RIP) software is essential for DTF. It allows the printer to handle white ink as an underbase and accurately manage color profiles. AcroRIP and CADlink are two leading options.
| Software | Version | Price | Key Features |
|---|---|---|---|
| AcroRIP | 10.5 | $398.99 | Works for DTF, DTG, & UV; dongle-based for multi-PC use. |
| AcroRIP | 11.4 | $394.19 | Adds multi-image handling; dongle-based. |
| CADlink | 10 | $394.99 | Digital format; single PC use. |
| CADlink | 11 | $194.99 | Digital format; single PC use. |
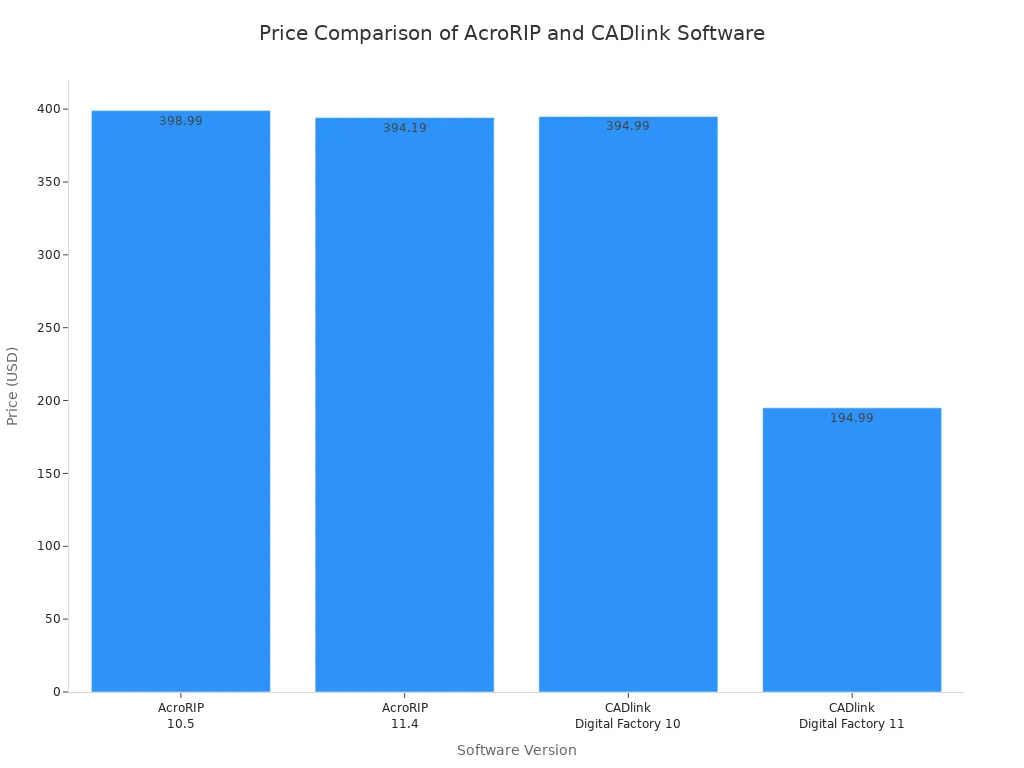
- AcroRIP: Uses a physical dongle, allowing operators to use the software on multiple computers.
- CADlink: Provides a digital license, which typically limits installation to a single PC.
Both companies offer 15-day evaluation licenses, giving users a chance to test the software before purchasing.
Required Consumables and Materials
Selecting the right consumables is just as important as the equipment. High-quality inks, film, and powder work together to produce vibrant, durable transfers. Using incorrect materials will lead to poor results and wasted resources.
Specialized DTF Inkjet Inks
Standard office inkjet ink is not compatible with the DTF process. Operators must use specialized water-based DTF inks. These inks contain a unique chemical composition designed for this application.
- Pigments: Titanium dioxide creates the opaque white underbase, while other pigments provide CMYK colors.
- Polymer Binders: These acrylic or polyurethane resins act as a glue, ensuring the ink adheres to the film and fabric.
- Additives: Surfactants and other agents control ink flow and prevent printhead clogs.
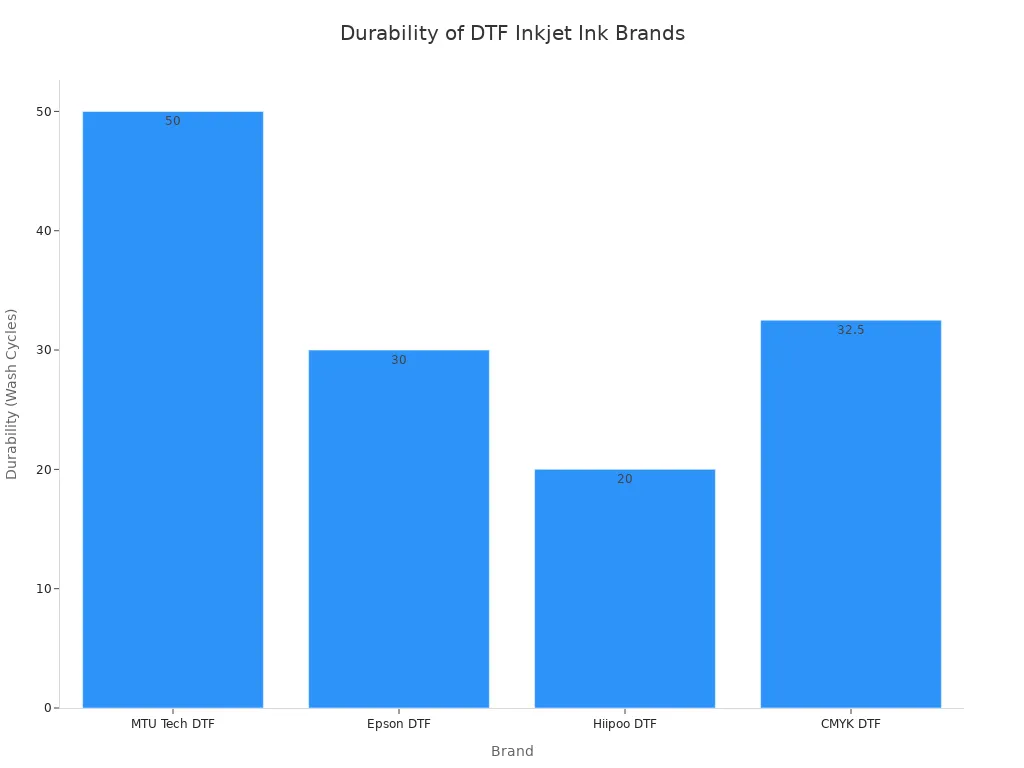
The quality of the ink directly impacts the final print's vibrancy and longevity. Certain brands offer superior performance.
| Brand | Durability (Wash Cycles) | Vibrancy/Quality |
|---|---|---|
| MTU Tech DTF | 50+ (no fading/cracking) | Exceptional color vibrancy, superior longevity |
| Epson DTF | 30 (minimal fading) | Good color saturation, reliable performance |
| Hiipoo DTF | 20 (began to fade) | Decent performance, budget-friendly |
Using DTF Film for Inkjet Printer
The transfer is printed onto a special Polyethylene Terephthalate (PET) sheet. A quality dtf film for inkjet printer has a coating that accepts and holds the ink. Key specifications include a thickness of 75-120 microns and high heat resistance. The film must allow ink to dry quickly to prevent bleeding. A good dtf film for inkjet printer ensures sharp details and complete transfers.
DTF Adhesive Powder
DTF adhesive powder is a thermoplastic polyurethane (TPU) that melts during curing. It bonds the printed ink to the fabric. The powder comes in different granule sizes for various applications.
| Powder Type | Particle Size (microns) | Use Cases |
|---|---|---|
| Fine Powder | 0-80 | Provides the softest feel; best for intricate, detailed designs. |
| Medium Powder | 80-150 | A versatile option balancing softness with good durability. |
| Coarse Powder | 150-250 | Offers maximum durability; ideal for workwear and sportswear. |
Choosing the correct powder ensures the transfer has the desired hand feel and durability for the specific garment.
The Step-by-Step Printing Process
Mastering the DTF process requires precision at every stage. From digital design to the final peel, each step builds upon the last. Following a systematic workflow is the key to producing consistent, high-quality custom apparel. This section breaks down the entire process into six manageable steps.
Step 1: Prepare Your Design
A professional transfer begins with a properly prepared digital file. Operators must optimize their designs to ensure sharp details and accurate colors.
- Resolution: Set the design resolution to 300 DPI (dots per inch) at the intended print size. This standard ensures the final print has clean edges and avoids pixelation.
- Color Mode: Convert all designs from RGB to the CMYK color mode. Printers use CMYK inks (Cyan, Magenta, Yellow, Black), so this conversion prevents unexpected color shifts during printing.
- File Format: Save the final artwork as a PNG or PDF file with a transparent background. This ensures only the design itself is printed.
- Color Management: Use ICC profiles that match the specific printer and ink set. RIP software like AcroRIP or CADlink uses these profiles to translate screen colors to printed colors accurately. Operators should avoid resizing images within the RIP software; all scaling must happen in the design program first.
Step 2: Print on the Film
With the design finalized, the next step is printing it onto the film. This is where the modified inkjet printer and RIP software work together. The RIP software controls the unique ink layering required for DTF. It first prints the CMYK color layer, then immediately prints a white ink underbase on top of it. This white layer provides opacity and makes the colors vibrant on any fabric color.
For optimal results, operators must configure specific settings in their RIP software:
- White Ink Density: Adjust the white ink density to a level between 180% and 220%. This ensures the colors appear bright and fully covered, especially on dark garments.
- Ink Saturation: Set the overall ink saturation between 85% and 90%. This prevents the dtf film for inkjet printer from becoming oversaturated, which can cause ink to bleed and interfere with powder adhesion.
- Print Speed: Select a slow or normal print speed. Slower speeds allow for more precise ink placement, preventing issues like banding and ensuring even color layering for a smooth, rich print.
Step 3: Apply the Powder
Immediately after the design prints, the operator must apply the DTF adhesive powder while the ink is still wet. The powder sticks only to the inked areas, creating the adhesive layer that will bond the design to the fabric.
- Application: Hold the printed dtf film for inkjet printer by its edges. Generously sprinkle the adhesive powder over the entire wet design. Using a shaker or a container with a sifter helps distribute the powder evenly and prevent clumps.
- Coverage: Ensure the entire inked area is completely covered with a layer of powder.
- Excess Removal: Gently tap the back of the film to shake off any loose powder. The goal is to have powder adhering only to the ink. The excess powder can be collected in a clean tray for reuse.
Note: Applying powder evenly is critical. Any missed spots will not transfer to the garment, and clumps of powder can create a rough texture.
Step 4: Cure the Transfer
Curing melts the adhesive powder, transforming it into a smooth, even layer of adhesive film. This step prepares the transfer for pressing. Operators can use a heat press or a dedicated curing oven.
| Curing Method | Temperature (Fahrenheit) | Time |
|---|---|---|
| Heat Press | 320°F - 350°F | 30 - 60 seconds |
| Curing Oven | 320°F - 350°F | 2 - 3 minutes |
To cure with a heat press, hover the top platen about a half-inch above the transfer without letting it touch. A properly cured transfer will have a glossy, slightly rubbery appearance, similar to orange peel texture. There should be no visible dry powder.
Caution: Be vigilant for signs of over-curing, such as a brittle or cracked appearance or a yellowish tint on the transfer. Over-curing can ruin the adhesive and lead to poor application.
Step 5: Press onto Fabric
Once the transfer is cured, it is ready to be applied to the garment. Correct temperature, pressure, and time are essential for a permanent bond.
Pro Tip: Always pre-press the garment for 5-10 seconds. This removes moisture and wrinkles, creating a flat, ideal surface for the transfer.
Place the garment on the heat press, position the cured transfer on the fabric, and press using the appropriate settings.
| Fabric Type | Temperature (°F) | Time (seconds) | Pressure |
|---|---|---|---|
| 100% Cotton | 310°F – 320°F | 15 – 20 | Medium to Firm |
| 100% Polyester | 280°F – 290°F | 10 – 15 | Medium |
| Blends (50/50) | 300°F – 310°F | 12 – 15 | Medium to Firm |
Step 6: The Cold Peel
After pressing, the final step is to remove the film. DTF is a "cold peel" process, meaning the transfer must cool down completely before the film is removed.
Set the garment aside and wait for it to cool to room temperature. This usually takes a few minutes. Once cool, start at one corner and peel the dtf film for inkjet printer back in a smooth, consistent, low-angle motion. The design should remain perfectly bonded to the fabric, revealing a vibrant and durable print. For enhanced durability, some operators perform an optional second press for 3-5 seconds with a protective sheet over the design.
Troubleshooting Common Issues
Even with the best equipment, operators can encounter challenges. Addressing issues like ink clogs, uneven powder, incorrect press settings, and poor adhesion is key to consistent production. A systematic approach to troubleshooting saves time and materials.
Preventing White Ink Clogs
White ink, with its heavy titanium dioxide pigments, is prone to clogging printheads. Operators must perform diligent maintenance to ensure smooth ink flow.
- Daily Routine: Before the first print, gently shake the white ink cartridges for 15 seconds. Run a nozzle check to verify all nozzles are firing.
- Regular Cleaning: At the end of the day, gently wipe the printhead surface with a compatible cleaning solution to remove any ink buildup.
- Environment Control: Maintain a room humidity above 40%. Dry air can cause the ink to thicken and clog the delicate printhead nozzles.
Fixing Uneven Powder Application
Static electricity is the primary cause of uneven powder application, causing powder to cling to non-inked areas. Operators can mitigate this issue by controlling their environment.
- Maintain a workshop humidity between 40% and 70% to reduce static buildup.
- Use an anti-static spray on the film path before printing.
- Allow film rolls to acclimate to room temperature, as cold film can generate more static.
Correcting Heat Press Settings
Incorrect heat press settings can ruin a garment. Too much heat or pressure causes scorching or shiny patches, especially on polyester fabrics.
Calibration is Key: Standard infrared thermometers are not accurate on aluminum platens. Operators should use a pyrometer with a contact probe to verify the press's temperature. If the reading varies by more than five degrees from the display, the machine requires recalibration following the manufacturer's instructions.
Solving Poor Adhesion
A transfer that peels or fails to stick is often due to fabric issues or improper curing.
- Check the Fabric: Some fabrics have water-resistant coatings that repel the DTF adhesive. Always pre-press garments to remove moisture, which can turn to steam and push the transfer away.
- Verify Curing: Under-cured powder will not melt completely, resulting in a weak bond. Conversely, over-curing can burn the adhesive, making it brittle. The cured powder should have a glossy, orange-peel texture before pressing.
Is DIY Inkjet DTF Right for You?
Deciding to build a DIY DTF setup requires a careful evaluation of its benefits against its demanding nature. Operators must weigh the initial investment and learning curve against the potential for creative freedom and long-term savings. This method offers professional results but demands a significant commitment.
The Pros: Cost and Versatility
DIY DTF printing provides remarkable versatility. Operators can produce vibrant, durable transfers for a wide range of fabrics, including cotton, polyester, and blends. Properly applied transfers demonstrate excellent longevity, often enduring 50 to 70 wash cycles without fading. The primary advantage is economic. While the initial investment is substantial, the material cost per print is low, ranging from $0.80 to $1.50. An operator can reach a break-even point against buying pre-made transfers after producing around 174 prints per month.
| Category | Owning DTF Printer | Buying DTF Prints |
|---|---|---|
| Initial Investment | $2,500 | N/A |
| 12-Month Total | $4,420 | $3,576 |
| Break-even Point | ~174 prints/month | N/A |
The Cons: Setup and Maintenance
The path to successful DIY DTF printing is steep. Users should expect a learning curve of two to four weeks to become proficient. The most significant challenge is the rigorous maintenance schedule.
Daily upkeep is non-negotiable. Skipping preventive maintenance leads to clogged nozzles, wasted materials, and costly equipment failure.
The heavy pigments in white ink settle quickly, requiring consistent circulation to prevent printhead damage. Operators must also master RIP software configurations and control environmental factors like humidity to avoid common issues. Neglecting these duties results in poor adhesion, color inaccuracies, and other print defects, making the process frustrating for those unprepared for the technical commitment.
DIY inkjet DTF is a viable method for creating custom apparel at home. An operator's success depends on investing in correct materials and mastering the process.
Consistent printer maintenance is non-negotiable for long-term quality. Users should expect to spend $10 to $20 per month on essential upkeep.
FAQ
Can I use a regular inkjet printer for DTF?
No. A standard printer cannot handle DTF inks or print a white underbase. Operators must convert a compatible model and use specialized RIP software to manage the process.
What is the most difficult part of DIY DTF?
The most challenging aspect is the rigorous maintenance. Daily cleaning and white ink management are non-negotiable to prevent clogs and ensure long-term printer reliability and print quality.
See Also
Nozzle Solutions: Essential Insights for Gardeners, Bioprinters, And Lubrication Experts
Automatic UV Coaters: Why They Are Crucial For High-Speed Printing
Leading Precoating Materials For Filtration Systems: A 2025 Outlook
Innovative Folder Gluer Features Trending In 2025 Carton Production Lines
AHRI 400/401 Heat Exchanger Assistance: Simplified And Hassle-Free Solutions