Need a grass seeds sorting solution? Try these top tools
A lush lawn begins with the soil, not just the seeds. While establishing direct statistical links between soil tests and turf quality is complex, the principle remains: fertile ground is essential. The right grass seeds sorting solution involves a methodical process using the correct tools in the proper sequence.
A homeowner's success depends on a five-tool system for perfect soil preparation before planting.
Why Soil Prep is Non-Negotiable for a Healthy Lawn
Proper soil preparation creates the ideal environment for germination and prevents the disappointment of a failed lawn. It directly addresses the biological needs of the seed, setting the stage for robust growth.
The Role of Soil in Seed Germination
Soil provides the essential foundation for a seed to sprout. Several key indicators directly influence germination rates and the future health of the turf.
- Soil pH: This factor affects nutrient absorption. Most lawn grasses thrive in a slightly acidic to neutral pH range of 6.0 to 7.0.
- Water Availability: Insufficient seed hydration delays germination by interfering with critical enzyme activity and metabolic processes.
- Salinity: High salt concentrations can inhibit germination, even though some elements like calcium are essential for plant growth.
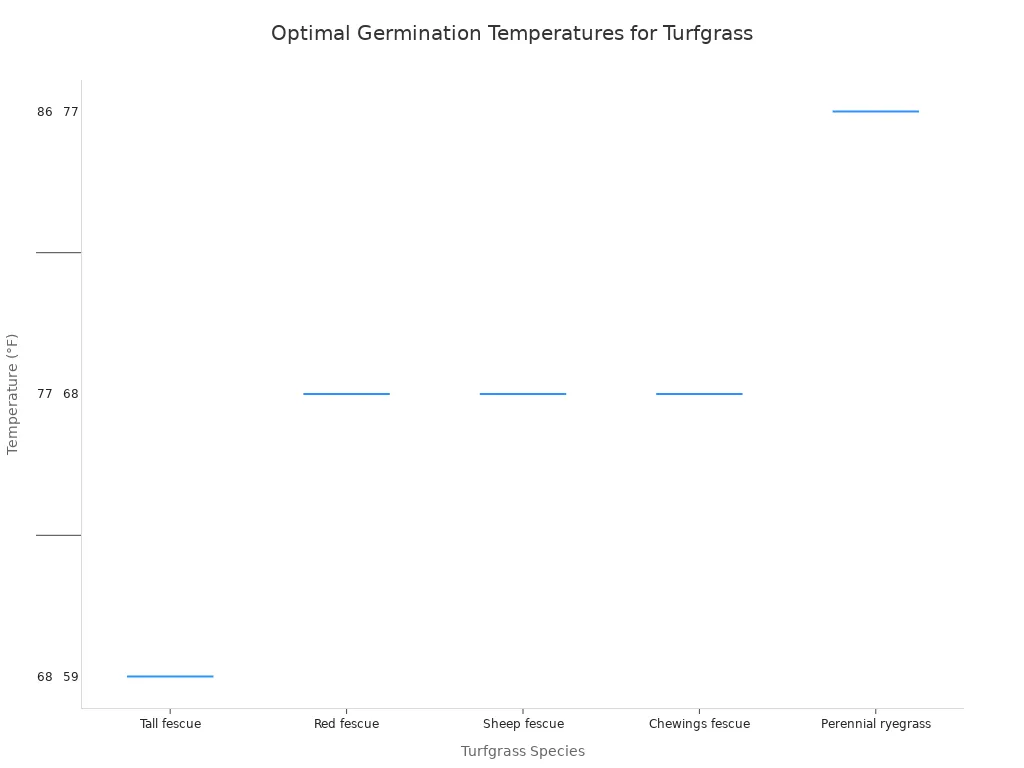
Soil temperature is another critical variable. Different grass species have unique optimal temperature ranges for germination, as illustrated below.
Avoiding Common Seeding Failures
Many seeding failures stem from correctable issues. A primary cause is poor seed-to-soil contact. Grass seed requires direct contact with soil to germinate; seed scattered on top of existing grass or thatch will likely dry out before it can establish roots.
Soil compaction presents another significant barrier. It increases soil density, making it difficult for new roots to penetrate. Roots cannot overcome a penetration resistance greater than 300 psi, which forces them to grow shallow and malformed. This restricted growth limits the plant's ability to find water and nutrients.
Common Seeding Pitfalls 📝 Homeowners often encounter patchy growth due to other avoidable mistakes. These include improper watering, plant diseases, pests like grubs, and heavy foot traffic on new seedlings.
The Ultimate Grass Seeds Sorting Solution: Your 5-Tool Kit

Achieving a perfect lawn requires more than just scattering seeds. The ultimate grass seeds sorting solution is a systematic, five-step process using specific tools to create an ideal seedbed. This method ensures seeds have the best possible environment for germination and growth.
Step 1: Clear and Turn with a Spade or Shovel
A homeowner begins by clearing the area of all existing vegetation, rocks, and debris. A spade or shovel is essential for this initial step. Use it to remove old turf and turn over the top layer of soil, breaking up large clumps and preparing the ground for deeper cultivation.
Step 2: Deeply Aerate with a Soil Tiller
Next, a soil tiller deeply aerates and loosens compacted earth. This mechanical cultivation is a key part of the grass seeds sorting solution.
- Till the soil to a depth of at least 3 to 4 inches.
- This process breaks up dense soil, allowing new roots to penetrate easily.
- Proper aeration also improves water and nutrient absorption.
Step 3: Grade and Refine with a Garden Rake
A garden rake refines the tilled soil. Pulling the rake gathers stones and debris, while pushing it levels the surface. This grading action removes high spots and fills low areas, which prevents water from pooling and washing seeds away. The goal is a fine, smooth texture that promotes optimal seed-to-soil contact.
Step 4: Firm the Seedbed with a Lawn Roller
After raking, a lawn roller gently firms the soil. A roller, typically filled halfway with water, presses the soil down just enough to create a stable seedbed. This step is vital because it ensures seeds can absorb the moisture needed to trigger germination. It eliminates air pockets without over-compacting the soil.
Step 5: Ensure Uniform Coverage with a Seed Spreader
The final step in this grass seeds sorting solution is applying the seed with a spreader. A spreader guarantees even distribution, preventing patchy growth. Homeowners can choose between two main types.
| Feature / Spreader Type | Broadcast Spreader | Drop Spreader |
|---|---|---|
| Accuracy | Requires more skill for uniform coverage. | Offers great precision in tight spots. |
| Coverage Control | Needs overlapping passes for evenness. | Drops seed straight down in neat rows. |
| Wind Impact | More affected by wind. | Not impacted by normal winds. |
Using a spreader with proper calibration ensures a consistent lawn density.
Tool Deep Dive: The Spade or Shovel
The spade or shovel is the foundational tool for any lawn renovation project. Its primary role is to prepare the canvas by clearing the ground of unwanted materials. This initial, manual step is critical for creating a clean slate for the new seedbed.
What It's For
A spade or shovel serves two main purposes in the grass seeds sorting solution. First, a homeowner uses it to remove old, dead turf, stubborn weeds, rocks, and other surface debris. A flat garden spade is particularly effective for slicing under existing sod. Second, the tool is used to turn over the top 4 to 6 inches of soil. This action breaks up large, compacted clods of earth. It also helps to incorporate any initial soil amendments, like compost, before the more intensive tilling process begins. This manual cultivation prepares the ground for deeper mechanical aeration.
Pro-Tips for Effective Use
Professionals use a specific technique to remove old sod efficiently, which saves time and energy. The process ensures clean removal and manageable sod pads.
- A homeowner should first water the area to moisten the soil. A sharp, flat spade is the best tool for this job.
- They then cut strips about two to three times the width of the shovel blade. The sides of each strip are cut along the full length of the area.
- Finally, they lift the leading edge by inserting the shovel just under the grass and prying it back. Pushing the shovel with a foot helps to get under the edge.
Essential Sod Removal Kit 🛠️ For this task, a professional's toolkit includes a D-handled flat garden spade, durable leather work gloves, and a wheelbarrow for transporting the removed sod pads.
Tool Deep Dive: The Soil Tiller
A soil tiller is the powerhouse of the grass seeds sorting solution. It performs the heavy lifting of breaking up compacted soil, a task that a spade or shovel cannot accomplish efficiently. This mechanical cultivation is crucial for creating a healthy root zone.
What It's For
A tiller's primary function is to aerate the soil deeply. It churns the earth to a depth of 3 to 4 inches, breaking up dense clay and compacted layers. This process allows oxygen, water, and nutrients to penetrate the ground, creating an ideal environment for new grass roots. The choice between a front-tine and a rear-tine tiller depends on the project's scale and soil condition. Rear-tine models are heavy-duty machines aggressive enough for hard, unworked ground, while front-tine tillers are better for loosening previously worked soil in smaller areas.
| Feature | Front-Tine Tiller | Rear-Tine Tiller |
|---|---|---|
| Best For | Small plots, existing gardens | Large areas, new beds |
| Soil Type | Loosening prepared soil | Breaking up hard, packed earth |
| Power | Lighter-duty engine | Heavy-duty, powerful engine |
| Maneuverability | Excellent in tight spaces | Best for open, straight lines |
Pro-Tips for Effective Use
Proper operation ensures both safety and effectiveness. Before starting, a homeowner must inspect the area and remove any stones, sticks, or debris that could damage the machine or cause it to jump unexpectedly.
Safety First! ⚠️ Always wear protective gear, including safety glasses, gloves, and sturdy, non-slip shoes. Keep bystanders, especially children, far away from the operating area to prevent serious injury from the rotating tines.
For best results, follow these professional guidelines:
- Familiarize yourself with the tiller's controls, especially how to stop it quickly.
- Avoid tilling too deep or too fast, which can overload the engine.
- Never make adjustments while the engine is running.
- If the tiller starts making unusual noises or vibrations, stop the engine immediately and inspect it.
- Disconnect the spark plug wire before cleaning or handling the tines.
Following these steps helps a user operate the tiller safely and achieve a perfectly cultivated seedbed.
Tool Deep Dive: The Garden Rake
After the tiller has loosened the soil, the garden rake steps in to refine the seedbed. This tool is essential for grading the surface, removing debris, and creating the fine texture necessary for optimal seed-to-soil contact. Its role is one of precision and final preparation.
What It's For
A rake's primary job is to create a smooth, level surface. A homeowner uses it to break up smaller soil clumps left by the tiller and to pull out stones, roots, and other debris. While many rake types exist, a few are particularly relevant for lawn preparation.
- Garden Rake: A versatile tool with rigid tines, excellent for breaking up compacted soil and general leveling.
- Landscape Rake: Features a very wide head, making it the ideal choice for leveling soil efficiently over a large area.
- Stone Rake: A heavy-duty option with strong, widely spaced tines designed specifically to comb through soil and remove rocks.
For the final grading of a new lawn area, a landscape rake is the professional's choice. Its width allows a user to smooth large sections quickly, ensuring a consistent and even surface before seeding.
Pro-Tips for Effective Use
Effective raking involves a two-part motion. A homeowner should use the tines to pull debris toward them, gathering rocks and sticks into piles for easy removal. The curved teeth of a bow rake are designed to latch onto these materials effectively. After clearing the debris, the user flips the rake over.
The Push-Pull Technique for a Perfect Finish ✍️ Use the flat back of the rake head to push soil away and fill in low spots. Alternate between pulling with the tines and pushing with the flat edge. This action erases ridges and creates a perfectly smooth, uniform seedbed.
For projects with significant rock content, specialized tools like a TURF RAKE stone picker can penetrate the soil to remove buried stones. This equipment dramatically reduces the manual labor required for achieving a clean, stone-free top layer, saving both time and effort.
Tool Deep Dive: The Lawn Roller and Seed Spreader
The lawn roller and seed spreader are the finishing tools in the grass seeds sorting solution. They work in tandem to ensure seeds make firm contact with the soil and are distributed evenly. Proper use of these tools is the final, critical step before watering a new lawn.
What They're For
A lawn roller's purpose is to gently firm the soil after it has been raked smooth. This action removes air pockets and creates a stable seedbed, which is essential for good seed-to-soil contact. It ensures that seeds can absorb moisture effectively to begin germination. The seed spreader follows this step. Its function is to apply grass seed uniformly across the prepared area. A spreader prevents the clumping and bare spots that often result from hand-seeding, guaranteeing a consistent, dense lawn.
Pro-Tips for Effective Use
Professionals follow specific procedures to maximize the effectiveness of both tools. For the lawn roller, a homeowner should let the tool's weight do the work without applying downward pressure.
Best Practices for Rolling ⚙️ A user should lightly water the lawn before rolling to soften the soil. They then roll the lawn in single, non-overlapping passes to create an even surface without over-compacting the ground.
Calibrating the seed spreader is equally important. Product labels provide a starting point, but each spreader is different. A user must calibrate their specific spreader for each type of grass seed.
- Calculate the total amount of seed needed for the area.
- Divide the seed into two equal halves.
- Set the spreader to deliver half the recommended rate.
- Make two separate passes over the lawn, with the second pass at a right angle to the first.
This two-pass method masks any minor skips and ensures complete, uniform coverage for a lush, professional-looking result.
Putting It All Together: The Step-by-Step Process

Transforming a patch of bare dirt into a lush lawn requires a methodical approach. The five essential tools—spade, tiller, rake, roller, and spreader—are most effective when used in a specific sequence. This complete grass seeds sorting solution ensures every action builds upon the last, creating the perfect environment for germination.
From Bare Dirt to Seed-Ready
The journey from bare ground to a seed-ready bed involves more than just turning over soil. A homeowner must address soil health, surface texture, and drainage. Each step prepares the ground for the next, culminating in a smooth, firm, and nutrient-rich seedbed. Skipping a step can compromise the final result.
The Correct Order of Operations
A professional follows a precise sequence to guarantee success. This order of operations combines soil amendment with proper tool usage for optimal seed-to-soil contact.
- Test and Amend the Soil. A homeowner begins by conducting a soil test to check pH and nutrient levels. They then apply amendments like compost, lime, or sulfur. A spade or shovel helps incorporate these materials into the top layer.
- Clear and Till the Area. Next, they remove all rocks, weeds, and old turf. A soil tiller then breaks up compacted earth to a depth of 3 to 4 inches, aerating the ground for root growth.
- Grade and Refine the Surface. A landscape rake is used to smooth the tilled soil. The user pulls the rake to gather debris and pushes it to level the surface, fixing drainage issues by eliminating low spots.
- Firm the Seedbed. The homeowner fills a lawn roller halfway with water. They roll the area to gently firm the soil, removing air pockets without causing over-compaction.
- Spread the Seed. Finally, they use a calibrated seed spreader for uniform coverage. Applying the seed in two perpendicular passes ensures a dense, even lawn without bare patches.
The complete grass seeds sorting solution relies on five key tools: a spade, tiller, rake, roller, and spreader. Following this methodical process empowers a homeowner to prepare the perfect seedbed for germination.
A user can now build a lush, healthy lawn with professional confidence and achieve outstanding results. 🏡
FAQ
Can a homeowner skip any of the five tool steps?
A homeowner should not skip steps. Each tool prepares the soil for the next stage. Following the sequence ensures the best results for seed germination and lawn health.
When is the best time of year to prepare soil for seeding?
A user should plant cool-season grasses in early fall. Warm-season grasses thrive when planted in late spring. This timing aligns with optimal soil temperatures for germination.
What if the soil is very rocky or full of clay?
For heavy clay, a homeowner can add compost during the tilling step. A stone rake helps remove rocks after tilling for a smoother, more refined seedbed.
See Also
Versatile Nozzle Solutions: A Comprehensive Guide for Diverse Professional Applications
Essential Industrial Checkweighers: The Top Three for Food Processing Facilities
Tablet Sampling Machines: An Ultimate Laboratory Selection Guide for Researchers
Unveiling Five Optimal Applications for Single Stage Rotary Vane Vacuum Pumps
Capsule Sorters: Understanding Their Critical Function in Efficient Defect Elimination