Troubleshooting Inconsistent Suction A Step-by-Step Fix
You may notice your vacuum has inconsistent suction. A simple blockage is often the primary reason. Other culprits include a full canister, dirty filters, or a tangled brush roll. Even a powerful Vacuum Pump, like those in a Single Stage Rotary Vane Vacuum Pump Set, relies on clear pathways.
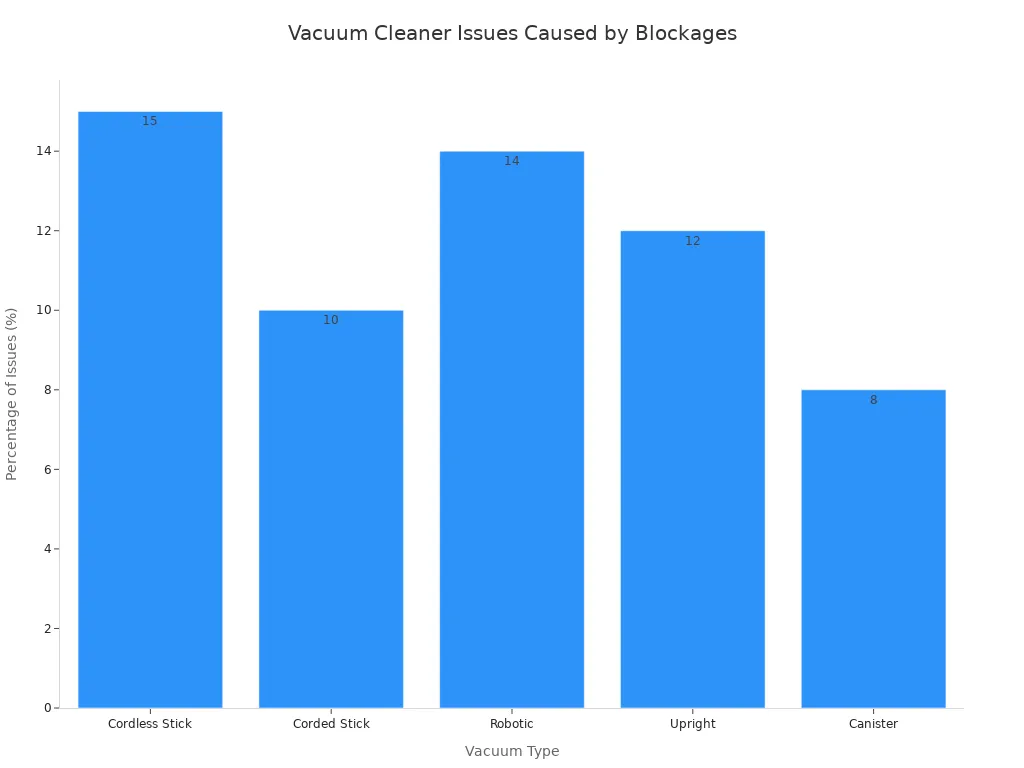
Did You Know? Clogs are a frequent cause of performance issues in many household vacuums.
Common Causes and Quick Fixes

You can often restore your vacuum's suction with a few simple checks. The most common issues are easy to spot and fix. Start with the most obvious culprits: the dustbin and the filters.
Check the Canister or Bag
Your first step is to examine the part of the vacuum that holds all the dirt. A full canister or bag is a primary cause of poor suction. It physically blocks air from flowing through the machine. While bagless vacuums often maintain suction even when the bin is nearly full, bagged models lose power as the bag fills up. A full bag reduces airflow, which lowers suction power. Using bags, however, can help protect your vacuum's motor by adding an extra layer of filtration.
Look for these clear signs that your canister or bag needs emptying:
- Your vacuum has noticeably less suction power.
- You notice a musty smell coming from the machine.
- Dust escapes back into the room while you vacuum.
- The "bag full" indicator light is on (if your model has one).
Pro Tip: You should empty your canister after every use. For bagged vacuums, change the bag once it is about two-thirds full to maintain the best possible suction.
Follow these steps to safely empty your vacuum:
- Always unplug the vacuum from the wall outlet first.
- Wear gloves to keep your hands clean.
- Disconnect the hose if you have a canister model.
- Follow your manufacturer's instructions to remove the bag or canister.
- Empty the canister into a trash can, preferably outdoors to minimize dust.
- If you have a bag, place the full bag inside a plastic liner and seal it before disposal.
Inspect and Clean the Filters
Filters are essential for trapping fine dust and preventing it from re-entering your air. A dirty filter blocks airflow, which directly causes the vacuum to lose suction efficiency. Ignoring a clogged filter is one of the fastest ways to damage your vacuum. It forces the motor to work harder, leading to overheating, excessive noise, and even permanent motor failure.
Warning: A clogged filter is a leading cause of vacuum pump failure. It can cause overheating, oil contamination in advanced pumps, and severe motor strain. Proactive filter cleaning is the best way to prevent this damage.
The table below shows the potential damage from neglecting your vacuum's filters.
| Malfunction | Cause by Filter Neglect |
|---|---|
| Reduced Pumping Speed | Worn internal parts from debris |
| Overheating | Increased friction and backpressure |
| Excessive Noise | Abrasive wear on moving components |
| Motor Strain/Failure | Overworking due to restricted airflow |
| Catastrophic Failure | Combined damage from heat and wear |
When to Clean or Replace Filters
Check your user manual for specific advice, but you can follow these general guidelines.
| Filter Type | Cleaning Frequency | Replacement Frequency |
|---|---|---|
| Washable Filters (Foam/Felt) | Every 1-3 months | N/A |
| Non-Washable Filters | N/A | Every 3-6 months |
| HEPA Filters | Tap to remove dust monthly | As per manufacturer (often 6-12 months) |
How to Clean Your Filters
For washable foam or felt filters, follow these instructions:
- Mix 2 cups of warm water with a few drops of dish soap.
- Submerge the foam filter and gently squeeze it several times.
- Rinse the filter and repeat the process until the water runs clear.
- Squeeze out all excess water. Do not wring or twist the filter.
- Let the filter air dry completely for at least 24 hours before putting it back in the vacuum.
For HEPA filters, you must be more careful. These filters use tightly woven fibers to catch tiny particles. Washing them can damage these fibers and ruin their effectiveness. Instead, gently tap the filter against the side of a trash can to dislodge loose dust and debris. Always check your manual to see if your specific HEPA filter is one of the rare washable types. If it is not, you must replace it.
Advanced Troubleshooting with a Single Stage Rotary Vane Vacuum Pump Set

If you have emptied the canister and cleaned the filters but still face suction problems, it is time for advanced troubleshooting. Deeper issues like blockages in the hose, a tangled brush roll, or air leaks can severely limit performance. Even a powerful industrial system like a Single Stage Rotary Vane Vacuum Pump Set relies on clear, sealed pathways to generate force. These advanced sets combine pumps with buffer tanks to create immense suction for applications in woodworking, packaging, and medical fields. Your home vacuum operates on the same core principles, just on a smaller scale.
How Do Powerful Vacuums Work? A single-stage rotary vane pump uses a spinning rotor with vanes inside a chamber. As the rotor turns, it creates expanding pockets of space to draw air in and shrinking pockets to compress and push air out. This continuous cycle generates powerful, consistent suction. A Single Stage Rotary Vane Vacuum Pump Set enhances this by using multiple pumps to increase suction capacity for demanding jobs.
Clear Hose and Attachment Blockages
A clog in your vacuum's hose or attachments acts like a dam, stopping airflow and killing suction. You can usually find the blockage with a visual inspection. Detach the hose and any wands or tools. Look through them toward a light source to spot obstructions.
If you find a stubborn clog, you can use several tools to clear it.
- Broom Handle or Dowel: Gently push a long, blunt object like a broom handle through the hose to dislodge the blockage.
- Hooked Wire: You can carefully use a piece of wire bent into a hook to pull out clogs near the ends of the hose.
- Toilet Snake: A plumber's snake can be fed through the hose. Once you feel it hit the clog, twist it to grab the debris and pull it out.
Pro Tip: Never use a sharp object that could puncture the hose. A small hole will create an air leak and a new suction problem. For very tough clogs, you can use an air compressor to blow the object out in the opposite direction.
Before attempting any repairs on a damaged hose, you should clean it thoroughly. Connect the hose to the vacuum and let it run for a minute to pull out any loose dust or debris. This simple step ensures you are working with a clean surface.
Examine the Brush Roll
The brush roll, or beater bar, is the spinning brush at the bottom of your vacuum head. Its job is to agitate carpet fibers, loosening deep-down dirt so the suction can pull it away. A non-spinning brush is much less effective. It can only pick up surface-level debris because airflow alone cannot lift dirt embedded deep in the carpet pile. A faulty brush roll is a common reason your vacuum seems to have lost its power on carpets.
You will know your brush roll has a problem if you see these signs:
- The brush roll is not spinning at all.
- The vacuum's automatic shut-off feature activates.
- Your vacuum spits dirt and debris back out onto the floor.
- You hear unusual noises coming from the vacuum head.
Often, the fix is as simple as cleaning it. Hair, string, and carpet fibers wrap around the brush and stop it from turning. This puts extra strain on the motor and belt, which can lead to more serious damage. Follow these steps to clean it safely.
- Unplug the Vacuum. Always disconnect the power before you begin any maintenance.
- Access the Brush Roll. Turn the vacuum over to expose its underside. Use a screwdriver to remove the bottom plate that covers the brush.
- Remove the Brush. Carefully lift the brush roll out. Take note of how it fits with the belt so you can put it back correctly.
- Cut Away Debris. Use scissors or a seam ripper to cut through the tangled hair and string. Pull all the debris off the bristles.
- Clean the End Caps. Pop the end caps off the brush roll. Clean out any hair or dust trapped in the bearings underneath. This is a critical step to prevent wear and tear.
- Reassemble. Place the clean brush roll back into its housing, making sure the belt is properly looped around it. Screw the bottom plate back on.
Regularly cleaning the brush roll and its bearings relieves pressure on the motor and belt, extending the life of your vacuum. It is a simple task that makes a huge difference, much like how maintaining the components of a Single Stage Rotary Vane Vacuum Pump Set ensures its longevity in industrial settings.
Inspect for Air Leaks
Your vacuum is a sealed system. It needs an airtight path from the cleaning head to the motor to create suction. Any crack, hole, or loose seal allows outside air to enter, which weakens the vacuum flow. A minor leak might cause a small drop in performance, but ignoring it can lead to bigger problems. An unchecked leak forces the motor to work harder, causing it to overheat and wear out faster. This is true for all vacuum systems, from your upright cleaner to a large Single Stage Rotary Vane Vacuum Pump Set used in manufacturing.
Finding a leak can be tricky. Start with a visual and physical inspection.
- Check the Hose: Carefully examine the entire length of the hose for any visible cracks or splits, especially in the flexible ridges.
- Inspect Seals and Gaskets: Look at the seals around the canister lid, filter compartments, and where the hose connects to the vacuum body. They should be soft and free of cracks.
- Feel for Air: With the vacuum running, run your hand along the hose and around all connection points. You may be able to feel air being sucked in where the leak is.
For small cracks in a plastic or vinyl hose, you can often perform a simple repair. A layer of 100% silicone or strong duct tape can seal the leak and restore suction. If a seal or gasket is worn out, you will need to order a replacement part from the manufacturer. Fixing leaks promptly is essential for maintaining the performance you expect, whether from a household machine or an industrial Single Stage Rotary Vane Vacuum Pump Set.
You can fix most suction issues yourself. Systematically check the bag, filters, hose, and seals for blockages. Regular cleaning is your best prevention method. However, a burning smell or grinding noise often signals a motor problem. You should seek professional service if these issues continue after your checks.
FAQ
Why does my vacuum still have weak suction after cleaning it?
Your vacuum's motor might be broken if cleaning does not restore suction. You should contact a professional repair service for help with motor or internal electrical issues.
How often should I clean my vacuum to prevent problems?
You should empty the canister after every use. Clean the filters every 1-3 months. Check the brush roll monthly for tangled hair to keep your vacuum running smoothly.
What causes my vacuum to smell bad when I use it? 💨
A bad smell usually comes from a full bag, dirty filters, or old debris trapped in the hose. Cleaning these parts regularly will remove the odor.
See Also
Unlock Peak Performance: Top Uses for Single Stage Rotary Vane Pumps
Unexpected Solutions: Troubleshooting Your Sulfur Recovery Catalyst Effectively
Rotary Vane Vacuum Pumps: Understanding Their Function and Operation
Optimizing Your Water System: The Benefits of Self-Priming Pumps
Essential Industrial Vacuums: Six Must-Have Cleaners for Businesses