DIY Auto Water Dispenser Setups for Worry-Free Travel
You can create a simple auto water dispenser for plants with just a container and cotton string. This method prevents common issues like yellowing leaves by slowly wicking moisture to the soil. With 66% of US households owning plants, this DIY setup offers peace of mind for your next vacation.
Key Takeaways
- Prepare your plants before you leave. Give them a good watering and group them to keep moisture in the air.
- Choose a simple DIY watering system. You can use a string, a plastic bottle, or a plastic bag to keep plants watered.
- Test your watering system before you go. This helps you fix any problems so your plants stay healthy while you are away.
First, Prep Your Plants for Your Trip
Before you build your watering system, you need to prepare your plants. A little prep work ensures your DIY setup works effectively and keeps your plants healthy while you are away.
Check Each Plant's Watering Needs
You should first understand that every plant has unique needs. A DIY system is not one-size-fits-all. Consider these factors for each plant:
- Plant Type: Tropical plants like ferns need more water than succulents or snake plants.
- Pot Size: Smaller pots dry out faster than larger ones.
- Light Exposure: Plants in sunny spots use more water than those in low light.
Knowing these details helps you customize your watering setup for each green friend.
Give a Thorough Pre-Vacation Watering
A deep watering right before you leave gives your plants a great start. This single watering can often sustain a plant for up to a week. For the best results, you can try bottom watering.
Pro Tip 🪴: Place your plant in a sink or tray with a few inches of water. Let it soak for 15-20 minutes until the topsoil is moist. This method ensures the entire root ball gets hydrated without leaving dry spots.
After soaking, let the pot drain completely so the roots are not sitting in water.
Boost Humidity to Retain Moisture
Higher humidity slows down water loss from the leaves. You can easily create a more humid environment for your plants.
- Group Plants Together: Plants release moisture through a process called transpiration. Grouping them creates a small, humid microclimate that benefits the whole cluster.
- Use a Humid Room: Move your plants to a bathroom or laundry room. These areas are naturally more humid and will help your plants stay hydrated longer.
Build Your DIY Auto Water Dispenser for Plants
Now you are ready to build your system. These three methods are simple, effective, and use common household items. You can choose the best auto water dispenser for plants based on your needs and the materials you have available.
Method 1: The String Wicking System
The string wicking system is a classic for a reason. It uses capillary action to pull water from a reservoir to your plant's soil, providing a slow and steady supply of moisture.
What You'll Need:
- A water container (like a jar, vase, or bucket)
- Absorbent string or cord
- Scissors
Step-by-Step Instructions:
- Choose Your Wick: Select a good wicking material. Synthetic fibers work best for this. Nylon rope and polyethylene (polyester) cords are excellent choices. You can also cut strips from a microfiber cloth. Avoid natural fibers like cotton, as they can rot over time.
- Prepare the Wick: Cut a piece of string long enough to reach from the bottom of your water container to a few inches into your plant's soil.
- Set Up the System: Fill your water container and place it next to your plant. Gently push one end of the string about 2-3 inches into the soil near the plant's base. Place the other end of the string into the bottom of the water container.
- Prime the Wick: Make sure the string is fully saturated with water to start the wicking process.
Pro Tip 🪴: The height of your water reservoir matters. For the best results, place the water container at the same level as the plant pot or slightly higher. This maximizes the capillary effect.
The wicking rate depends on the setup. A simple system might deliver around 900 ml of water on the first day and then slow to about 100 ml per day.
| Wick Height (Reservoir to Soil) | Wicking Effect |
|---|---|
| 0 inches (wick not in soil) | No water reaches the roots. |
| 12-24 inches | Reliable wicking for most setups. |
| Over 24 inches | Capillary action weakens significantly. |
For tech-savvy gardeners, you can even build a high-tech auto water dispenser for plants using an Arduino and a soil moisture sensor to control a small pump.
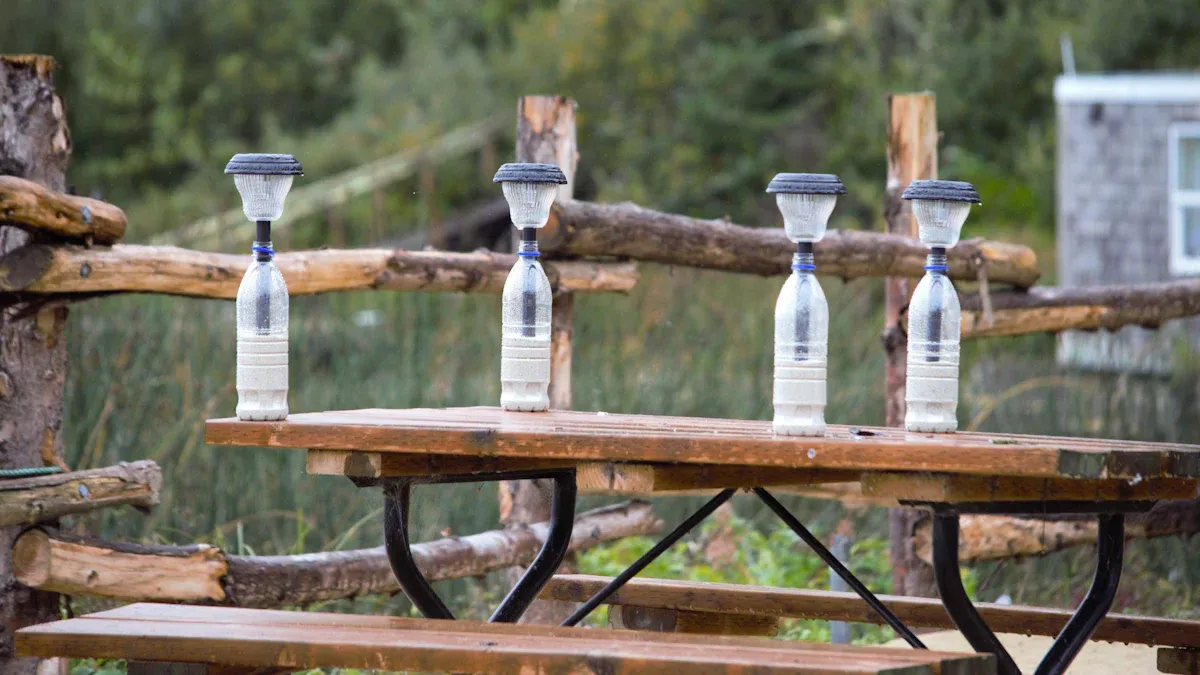
Method 2: The Plastic Bottle Drip System
This method turns a simple plastic bottle into a slow-drip irrigator. It is great for individual plants that need consistent moisture.
What You'll Need:
- A clean plastic bottle (any size)
- A small nail, pin, or drill bit
Step-by-Step Instructions:
- Prepare the Bottle: Take a clean plastic bottle and remove the label.
- Make the Holes: Carefully poke one or more small holes in the bottle's cap using a nail or pin. The number and size of the holes will determine the drip rate. Start with one small hole and test it.
- Fill and Place: Fill the bottle with water and screw the cap back on. Turn the bottle upside down and quickly bury the neck a few inches into the soil next to your plant.
- Stabilize the Bottle: Ensure the bottle is stable and will not fall over. You can lean it against the pot's rim or a small stake.
A common mistake is expecting a large wet spot. Drip systems are very efficient. You only need a small wet area on the surface, as the water will travel down to the roots. If the drip slows or stops, the holes in the cap may be clogged. Just unscrew the cap and use a pin to clear any debris.
Method 3: The Greenhouse Bag Method
This technique creates a personal greenhouse for your plant. It traps humidity from the leaves and returns it to the soil, recycling water and keeping the plant hydrated.
What You'll Need:
- A large, clear plastic bag (big enough to cover the plant and pot without touching the leaves)
- Stakes (optional, to hold the bag up)
Step-by-Step Instructions:
- Water Your Plant: Give your plant a thorough watering before you begin. Let any excess water drain away.
- Position the Stakes: If needed, place stakes in the pot to create a frame. This frame will keep the plastic from touching the plant's foliage, which helps prevent rot.
- Cover the Plant: Gently pull the plastic bag over the entire plant and pot.
- Secure the Bag: You can tuck the bottom of the bag under the pot to trap the moisture inside.
- Provide Ventilation: It is a good idea to add a few small slits to the bag for ventilation. This prevents the environment from becoming too humid, which can attract pests.
Important Note: This method works by trapping humidity. You must keep the plant out of direct sunlight. A plant inside a plastic bag in the sun can overheat quickly, causing serious damage. Place it in a spot with bright, indirect light.
This setup is an easy auto water dispenser for plants that recycles its own moisture, but it is best for shorter trips of one to two weeks.
Choose the Right Setup for Your Needs
You have learned three great DIY methods. Now you can select the perfect one for your home. Your choice depends on your plants and how long you will be gone.
Match the Method to Your Plant Type
Every plant has unique watering needs. Thirsty plants like ferns and many flowering varieties need consistent moisture. Succulents and cacti, however, prefer to dry out between waterings. You should match your watering system to your plant's personality.
- Thirsty Plants: The string wicking and plastic bottle drip systems are excellent choices. They provide a steady supply of water directly to the roots.
- Humidity Lovers: Tropical plants will love the greenhouse bag method. It creates a humid microclimate that mimics their natural environment.
- Dry-Loving Plants: For succulents, a deep pre-vacation watering is often enough for a short trip. A DIY system could give them too much water.
Quick Guide 🪴: Use this table to find the best fit.
If your plant needs... Try this method... Consistent, slow moisture String Wicking or Bottle Drip High humidity Greenhouse Bag Occasional watering A thorough pre-soak is often enough
Adjust for Short vs. Long Trips
The length of your vacation is a major factor. A short weekend trip has different needs than a two-week holiday.
For a short trip of a few days, a simple DIY water wick or a plastic bottle system is very reliable. These setups are easy to make and provide enough water to keep your plants happy.
Longer trips of one to two weeks require a bit more planning. You will need a larger water reservoir for your string wicking system to ensure it does not run dry. For the bottle method, you might use a bigger 2-liter bottle. The greenhouse bag method also works well for trips up to two weeks, as it recycles its own water.
Test Your System Before You Leave
You built your DIY watering system. Now you must test it. A quick trial run prevents vacation disasters and ensures you return to happy, healthy plants.
Why a Trial Run is Essential
A trial run shows you exactly how your system will perform while you are gone. It helps you spot problems before they become serious. You can see if the water flows too fast or too slow. This step is crucial for success. Some gardeners test their self-watering setups for several weeks to see how they work over time. A longer test, even for a few days, gives you a much better idea of the system's reliability for an extended trip. You can confirm your plants get the right amount of moisture without becoming waterlogged or drying out.
Peace of Mind Check ✅: A successful test gives you confidence. You can relax on your trip, knowing your green friends are getting the care they need.
Final Adjustments for a Perfect Setup
Your trial run will likely reveal a few things to tweak. You can make small changes for a perfect setup. Pay attention to the soil moisture and the water level in your reservoir.
Here are some common adjustments you might need to make:
- Water Flow is Too Fast: If the soil is soggy, your system is too efficient. For a string wick, use a thinner string. For a bottle drip, make the hole in the cap smaller or use fewer holes.
- Water Flow is Too Slow: If the soil is dry, your plant needs more water. For a string wick, use a thicker, more absorbent cord or add a second wick. For a bottle drip, carefully widen the hole or add another one.
- Reservoir Empties Quickly: Your plant may be very thirsty, or the flow rate is too high. Consider using a larger water container for your trip.
You can travel without stress using a simple auto water dispenser for plants. A few minutes of prep with your auto water dispenser for plants ensures you return to a home filled with healthy plants.
Now go enjoy your trip—your plants are all set! 🪴
FAQ
Can I use cotton string for the wicking method?
You can use cotton for short trips. It works well but can rot over time. Synthetic fibers like nylon are a more durable choice for extended vacations.
Will these DIY systems work for outdoor plants?
These systems are best for indoor plants. Outdoor conditions like sun and wind cause water to evaporate too quickly, making the DIY methods less reliable for your garden.
How do I know if my plant gets too much water? 💧
Look for yellowing leaves and soggy soil. These are common signs of overwatering. A successful test run before your trip helps you prevent this problem from happening.