Direct to Film Printing Your Complete Starter Kit Guide
You are entering the growing direct to film printing market. This industry is set to expand significantly, showing strong potential for new businesses.
| Attribute | Details |
|---|---|
| Global DTF Market (2024) | USD 2.72 billion |
| Projected Market (2030) | USD 3.92 billion |
You need a starter kit with a printer, heat press, inks, film, and powder. The custom t-shirt market alone is projected to reach over USD 10.33 billion by 2030.
Note: A safe workspace with good ventilation is essential for your health and success.
Key Takeaways
- You need a DTF printer, heat press, and curing station. These tools help you print designs onto film and then transfer them to clothes.
- You must use special DTF inks, adhesive powder, and transfer film. These supplies make your designs bright and long-lasting.
- Follow a 5-step process: print, powder, cure, press, and peel. This ensures your custom apparel looks professional and lasts a long time.
The Core Equipment Checklist
You need the right tools to build a successful printing business. Your core equipment forms the foundation of your entire workflow. Each piece has a specific job. Together, they turn your digital ideas into wearable art. Let's explore the three main components you will need.
DTF Printer and RIP Software
Your DTF printer is the heart of your setup. It prints your colorful designs onto special PET film. Unlike a standard office printer, a DTF printer uses specific textile inks, including a crucial white ink layer. This white ink acts as a base on dark fabrics, making your colors pop.
The printer, however, cannot work alone. You need Raster Image Processing (RIP) software to act as its brain. This software translates your design file into a language the printer understands. It gives you control over ink levels, color profiles, and most importantly, the white ink underbase. Good RIP software is essential for high-quality, vibrant prints.
Tip: Many starter DTF printers come bundled with RIP software. You should confirm this before you purchase to avoid unexpected costs.
When you compare software, you will find different features that affect your workflow. Here is a look at two popular options:
| Feature | AcroRIP | CADlink Digital Factory |
|---|---|---|
| Processing Speed | Offers fast load times for designs. | Provides optimized speeds and better handling of multiple jobs. |
| Job Handling | Supports placing multiple images on one sheet. | Features a single-window interface to manage all your print jobs. |
| White Ink Workflow | Prints white and color layers in a single pass. | N/A |
| Color Management | Allows you to create custom ink channel settings. | Includes advanced tools for precise color correction and tweaks. |
| User Interface | Known for its simplicity and straightforward installation. | Praised for its unique, all-in-one visual hub for managing jobs. |
Heat Press Machine
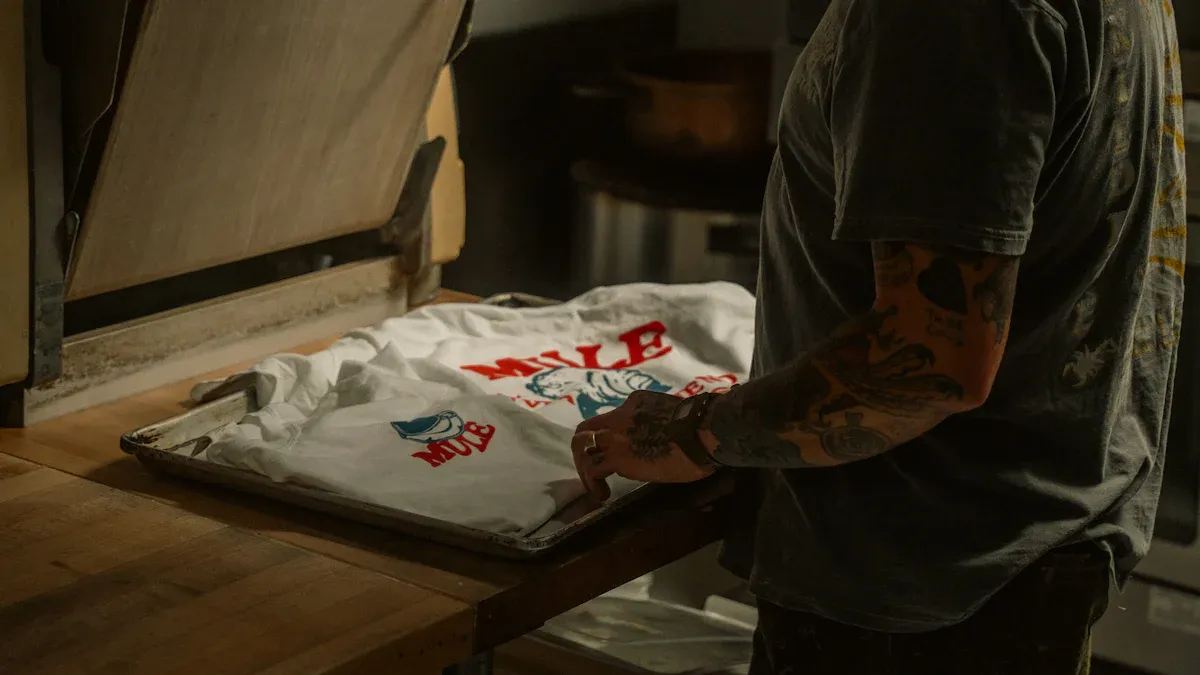
A heat press is the machine that transfers your printed design from the film to the garment. It uses a combination of heat and pressure to permanently bond the ink and adhesive to the fabric. You cannot substitute a home iron for this step. A heat press provides the consistent temperature and even pressure needed for a durable, professional finish.
You will primarily choose between two styles: clamshell and swing-away.
A clamshell press opens and closes like a mouth.
- It is great for beginners and takes up very little space.
- Its simple up-and-down motion makes production fast.
- However, the top plate can block your view, increasing the risk of burns. It may also apply uneven pressure on thicker items.
A swing-away press allows the top heat plate to move completely to the side.
- This gives you full, safe access to the lower plate to position your garment and transfer.
- It applies perfectly even, vertical pressure, which is ideal for thicker materials.
- The main drawbacks are that it requires more workspace and is slower to operate.
Your choice depends on your workspace, budget, and the types of products you plan to make. For standard t-shirts, a clamshell is often enough. For thicker items like hoodies or plaques, a swing-away offers more versatility.
Regardless of the model, you must use the correct settings for each fabric type. Using the wrong temperature can scorch the fabric or result in a poor transfer.
| Fabric Type | Temperature | Pressure |
|---|---|---|
| 100% Cotton | 315–325°F | Firm |
| 100% Polyester | 270°F | Medium to firm |
| Polyester Blends | 275-280°F | Medium to firm |
Powder and Curing Station
After printing your design, you must apply an adhesive powder. This powder sticks only to the wet ink. When melted, it creates the glue layer that bonds your design to the fabric. You then need a way to cure, or melt, this powder. This is where a curing station comes in.
For a manual workflow, you can shake the powder over the film in a shallow bin and then use a separate curing oven. Some people even use their heat press in "hover" mode, placing the heat plate just above the film without touching it.
For higher volume production, you should consider an automatic powder shaker. This machine automates the entire process.
- It applies an even coat of powder to the print.
- It shakes off the excess powder for reuse.
- It runs the film through an integrated oven to cure it perfectly.
An automatic shaker streamlines your direct to film workflow, offering several key advantages:
- Saves Time: It automates a slow, manual task, boosting your productivity.
- Ensures Consistency: You get uniform powder application on every print for reliable quality.
- Reduces Waste: The machine reclaims unused powder, saving you money on supplies.
- Improves Safety: A closed powder system keeps your workspace cleaner and reduces airborne dust.
While a manual setup works for starting out, an automatic powder station is a smart investment as your business grows. It reduces errors, lowers labor costs, and allows you to handle larger orders with ease.
Essential Consumables and Supplies
Your core equipment is only half of the equation. You also need the right consumables to bring your prints to life. These supplies—inks, powder, and film—work together in the direct to film process. Choosing high-quality supplies is just as important as choosing a good printer. It directly affects the look, feel, and durability of your final products.
DTF Inks (CMYK + White)
DTF printers use a special set of water-based pigment inks. Your setup will require five colors: Cyan, Magenta, Yellow, and Black (CMYK), plus White. The CMYK inks create the colorful part of your design. The white ink is essential. It prints as a base layer under the colors, which allows your design to show up brightly on dark or colored fabrics. Without it, colors would look dull and transparent.
The quality of your ink determines the vibrancy and longevity of your prints. While budget-friendly inks can lower your initial costs, premium inks offer better long-term value. They provide superior color and can withstand more wash cycles before showing wear.
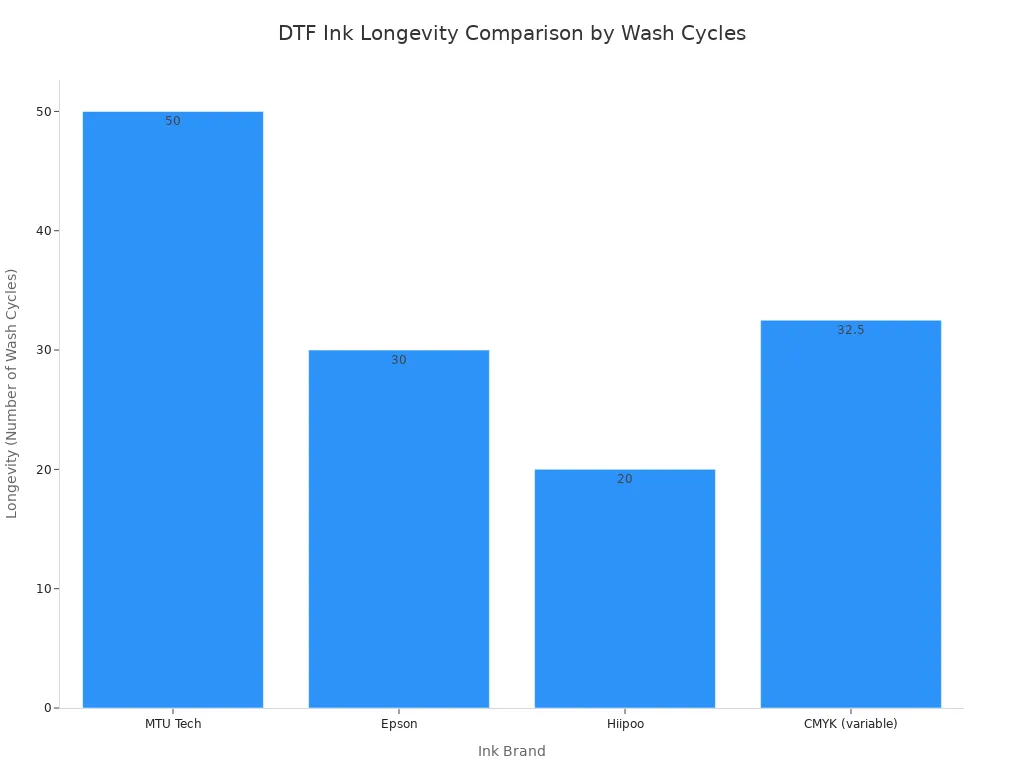
This comparison shows how different ink brands perform over time:
| Ink Brand | Key Features | Longevity (Wash Cycles) | Quality/Vibrancy |
|---|---|---|---|
| Premium Options | |||
| MTU Tech | Superior color vibrancy, excellent adhesion, wash/fade resistance, compatible with most DTF printers | 50+ (no fading/cracking) | Top-tier, vibrant |
| Epson | Reliable performance, good color saturation | 30 (minimal fading) | Good |
| Budget-Friendly Options | |||
| Hiipoo | Affordable, easy to use, suitable for light to medium use | 20 (began to fade) | Decent, but not as vibrant as premium |
| CMYK (variable) | Wide color gamut, good for intricate designs | 25-40 (varied by brand) | Variable |
As you can see, premium inks deliver prints that last significantly longer.
Tip: Always use inks designed specifically for your printer model. Using incompatible inks can lead to clogs, poor print quality, and even damage your printer's printhead.
DTF Adhesive Powder
DTF adhesive powder is the magic ingredient that turns your print into a transferable graphic. After you print the design onto the film, you coat the wet ink with this fine, granular powder. The powder sticks only to the ink. When you heat it, the powder melts and forms a smooth, even layer of glue. This adhesive layer is what bonds your design to the fabric during the heat press step.
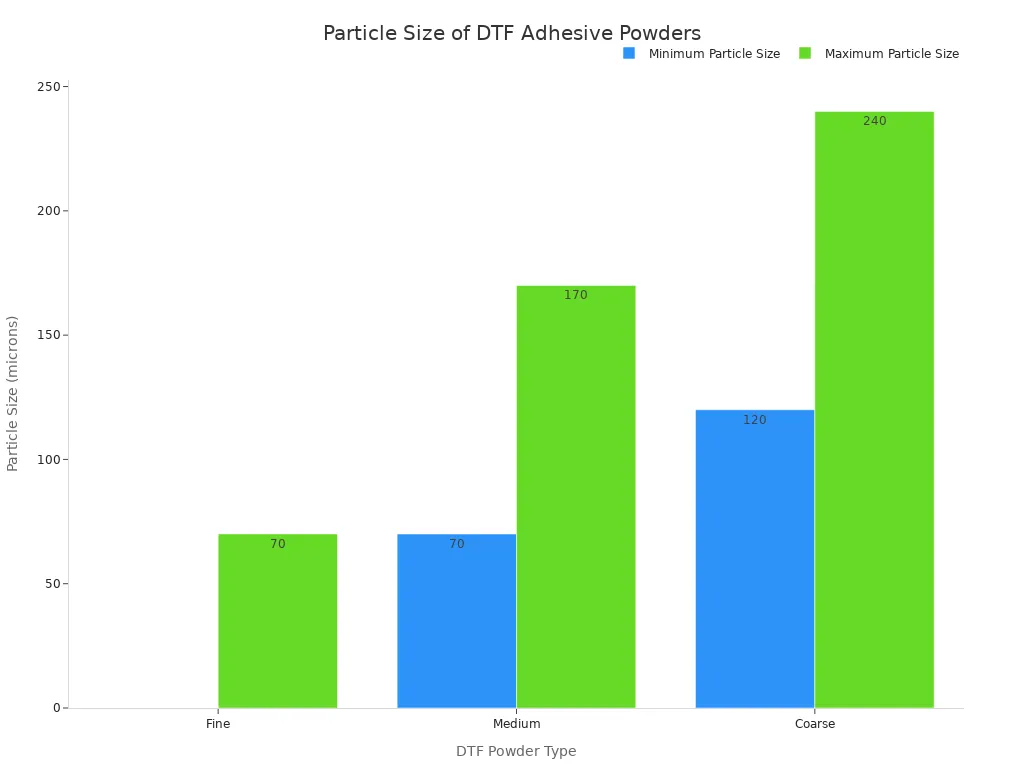
These powders come in different particle sizes, or grades. The grade you choose affects the hand feel and durability of the print.
You should select a powder based on your design's needs.
| DTF Powder Type | Particle Size (microns) | Key Characteristics | Use Cases / Considerations |
|---|---|---|---|
| Fine | 0-70 (like flour) | Good hand feel; weak fastness (especially in high humidity); prone to sticking | Small lettering and details |
| Medium | 70-170 (like table salt) | Most common; easy to shake and clean; good balance of hand feel and durability | General DTF printing (80-160 microns) |
| Coarse | 120-240 (like sugar) | Thickest adhesive layer (stronger adhesion); can feel slightly rougher | Not ideal for very fine details |
Working with Stretchy Fabrics? 👕
For performance wear like spandex, you need a special powder. Choose an adhesive with flexible polymers. These formulations preserve the fabric's natural stretch. Advanced methods further improve bonding on these materials:
- Plasma Treatment: This process treats the powder's surface, boosting its ability to stick to slick fabrics.
- Structural Optimization: This uses analysis to create adhesive patterns that reduce stress and prevent the design from peeling off when stretched.
DTF Transfer Film (PET Film)
DTF transfer film, also called PET film, is the carrier sheet for your design. You print your artwork directly onto this film. It holds the ink and powder until you are ready to press it onto a garment. These films are engineered to withstand the high heat of the curing and pressing steps. They come in sheets or rolls and are available in two main types: hot peel and cold peel.
The type of film you choose changes your workflow.
- Hot peel film allows you to peel the film away immediately after pressing. This makes it faster for high-volume jobs.
- Cold peel film requires you to wait for the transfer to cool completely before peeling. This process is slower but often produces a sharper, more durable result.
| Consideration | Cold Peel | Hot Peel |
|---|---|---|
| Process | Requires the transfer to cool completely before peeling. | Involves immediate peeling of the transfer while it's still hot. |
| Speed | Slower due to the necessary cooling time. | Faster, allowing for quick progression to the next item. |
| Quality | Tends to yield sharper, more detailed prints due to better adhesive bonding during cooling. | Can achieve very high quality but demands precise execution during immediate peeling. |
| Ease of Use | More forgiving, as cooling time allows for adjustments. | Requires greater skill and precise timing for optimal results. |
| Project Suitability | Best for large or detailed projects where print quality is the top priority. | Ideal for high-volume orders where production speed is critical. |
Beyond the peel type, you also need to consider the film's thickness, measured in microns (μm). Thickness affects how the film handles during printing and the final feel of the design on the shirt.
| Film Thickness (μm) | Printing Process Impact | Final Product Impact | Ideal Use Case |
|---|---|---|---|
| 75 | - Thinner, more flexible, and softer to the touch. - Requires more precise control during printing to avoid curling or wrinkling. - Less stable during high-speed printing. | - Softer hand feel. - Less durable. - More prone to damage during washing or stretching. | - Delicate fabrics. - Garments requiring a very soft hand feel. - Small, intricate designs. |
| 80 | - Good balance between flexibility and stability. - Easier to handle than 75μm film. - Suitable for a wider range of printing speeds. | - Good hand feel. - Moderate durability. - Good resistance to washing and stretching. | - General-purpose DTF printing. - Most common choice for various fabrics and designs. |
| 100 | - Thicker, more rigid, and more stable. - Easier to handle, especially for large designs. - Excellent stability during high-speed printing. - Less prone to curling or wrinkling. | - Stiffer hand feel. - More durable. - Excellent resistance to washing and stretching. | - Large designs. - Fabrics requiring high durability. - Industrial DTF printing. - Designs with large areas of solid color. |
Choosing the right combination of ink, powder, and film is key to mastering your craft and producing professional-quality custom apparel.
The 5-Step Direct to Film Process

You can master the direct to film process by following five key steps. Each stage builds on the last, turning your digital file into a finished product. Following these instructions carefully ensures a high-quality result every time.
Step 1: Print Your Design
First, you send your design to the DTF printer. You should set your resolution to at least 1440x720 dpi for sharp details. Your RIP software will print the color layer first, then a white ink base on top. If you see lines (banding) in your print, check that your room has stable humidity and your RIP software settings are correct.
Step 2: Apply the Adhesive Powder
While the ink is still wet, you must apply the adhesive powder. You should generously coat the entire design in a shallow tray to catch the excess. Once covered, you gently tap the film to shake off any loose powder. The goal is to have powder stick only to the wet ink.
Step 3: Cure the Transfer Film
Next, you need to melt the powder. You can use a curing oven set between 212–230°F for about two to three minutes. A properly cured transfer will have a glossy, orange-peel texture. If the powder looks oily, it is under-cured. If the film turns yellow, it is over-cured.
Step 4: Press the Design onto Fabric
Before applying the transfer, you must prepare the garment. You should pre-press the fabric for 5–7 seconds. This step removes moisture and wrinkles, which prevents issues later. Then, you place the cured transfer onto the garment and press it using the correct time and temperature for your fabric.
Step 5: Peel and Finish
How you peel depends on your film type. You peel hot peel film immediately after pressing. You let cold peel film cool completely before peeling. After peeling, you can do a final post-press for 2–4 seconds with a protective sheet. This second press softens the design's feel and improves its durability.
Setting Up Your Workspace
Your workspace is more than just a place for your equipment. You must create a safe and efficient environment. A well-planned space protects your health and improves your workflow. It is a critical part of your business success.
Creating Safe Work Zones
You need to organize your space into specific zones for safety. Your heat press is a major heat source. You must keep it away from flammable materials like paper, chemicals, and cleaning supplies. A safe workspace prevents accidents.
Safety First! OSHA guidelines suggest keeping a safe distance between heat and combustible items.
- You should move all flammable materials at least 35 feet away from your heat press.
- If you cannot move them, you must use flameproof covers to protect them.
- Always keep the floor clean and free of debris.
Ventilation and Air Quality
Good air quality is non-negotiable. The DTF process releases fumes and fine powder particles into the air. You need a proper ventilation system to protect your lungs. An air purifier is an excellent investment for your health. Look for a system with:
- High Airflow: A rating around 3200 CFM (Cubic Feet per Minute) is effective.
- Advanced Filtration: A three-stage system with a HEPA filter can achieve a purification rate of 99.91%.
You must also wear Personal Protective Equipment (PPE).
- Eye Protection: Use goggles to block powder and ink splashes.
- Hand Protection: Wear latex gloves to keep your skin clean.
- Respiratory Protection: A respirator or face mask is essential to avoid inhaling fumes and dust.
Budgeting for Your Starter Kit
You can start your DTF business with an initial investment. A complete entry-level starter kit in 2024 costs between $5,000 and $10,000. Your total cost will depend on the equipment you choose.
Here is a basic cost breakdown for your starter kit:
| Item | Estimated Cost |
|---|---|
| Basic DTF Printer | $3,000 - $6,000 |
| Heat Press | $500 - $1,500 |
| Initial Supplies | $500 - $1,000 |
| Computer & Software | $1,000 - $1,500 |
| Total | $5,000 - $10,000 |
This budget gives you everything needed to start producing high-quality custom apparel.
You now have the complete checklist for your starter kit. It covers your printer, heat press, and all essential supplies. A safe, organized workspace is just as crucial as the equipment itself. Use this guide to confidently begin your direct to film printing journey.
Ready for the next level? 🚀 Once you master the basics, you can grow your business by:
- Exploring special effect powders like glow-in-the-dark or metallics.
- Offering bulk order discounts to local businesses and schools.
- Partnering with graphic designers or influencers to create new product lines.
- Delegating tasks to focus on marketing and business growth.
FAQ
What is the most important safety equipment?
You need a proper ventilation system to remove fumes. You must also wear a respirator, gloves, and eye protection to stay safe while working.
Can I use a regular office printer for DTF?
No, you cannot use a regular printer. DTF requires special printers that handle pigment inks and a white ink layer for vibrant designs on all fabrics.
Why is RIP software so important?
RIP software tells your printer how to print. It controls ink levels and creates the white base layer. This ensures your colors look bright and accurate.
See Also
Essential Frame Plate Kits: A Novice's Guide to Auto Reinforcement
Leading Precoating Materials for Advanced Filtration Systems: 2025 Outlook
Understanding Nozzle Solutions: A Guide for Diverse Industry Professionals
Automatic UV Coaters: Crucial for Achieving High-Speed Printing Excellence
Tablet Sampling Machines: The Definitive Laboratory Selection Handbook